The Receive Fruit action in InnoVint is your first step when bringing fruit weight into your facility from a vineyard.
This article covers:
- What does the Receive Fruit action do?
- Receive Fruit via Direct Action
- Schedule & Receive via Work Order
- How to Receive Fruit without a weigh tag
- Edit, Delete, or Void a Weigh Tag
What does the Receive Fruit action do?
This action records time of arrival, weigh tag (see your weigh tag options here), weight, and composition details - vineyard, block, variety, and appellation - for your Fruit Lot attributes.
- The Receive Fruit action can only be recorded on Fruit lots.
- If you do not already have a Fruit lot created in InnoVint, you can create a new Fruit lot code from within the Receive Fruit direct action or work order task.
- Each Receive Fruit action corresponds to one weigh tag.
- If you need multiple weigh tags, be sure to utilize multiple Receive Fruit actions.
- The Receive Fruit action can be recorded on the same Fruit lot multiple times.
Note: The Process Fruit action (the next step after receiving fruit) includes the option to archive a lot if it will no longer have contents.  If you plan to receive fruit on the same fruit lot in the future, don't forget to uncheck this box - or you can unarchive the Fruit lot from the Lot details page when you are ready to receive fruit on that lot again.
Receive Fruit via Direct Action
Where to Find the Receive Fruit action
- In the top Nav bar or the Fruit Lot details page, via the Record action menu
- In the Fruit Lot Explorer, via the blue Receive weight button

- On the Vineyard Dashboard, via the Receive Fruit button

- On the Harvest Launchpad, via the Receive unscheduled Fruit button
How to submit your Receive Fruit action
You can perform a Receive Fruit action with Simple Receive Fruit (input your own weigh tag number and the net weight) or Advanced Receive Fruit (input tare and gross weights, InnoVint will generate sequential weigh tag numbers).
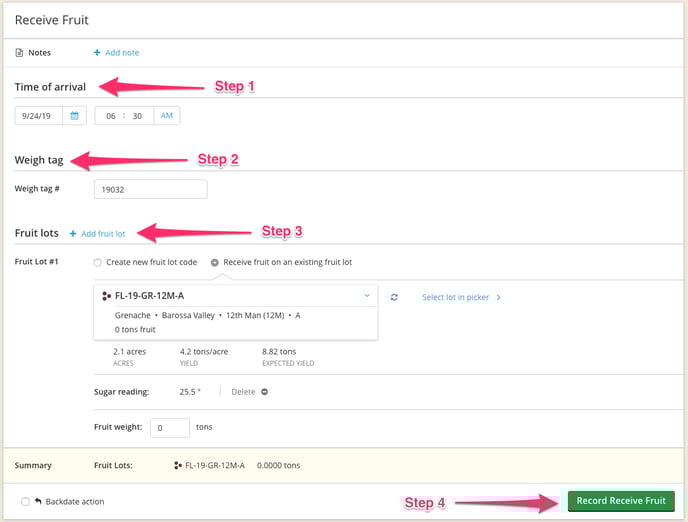
Using Simple Receive Fruit
- Time of arrival defaults to the current date and time. Review and change this if necessary.
- Weigh tag: Enter the weigh tag number from your paper weigh tag.
- Fruit lots
- Choose to create a new fruit lot or select an existing fruit lot.
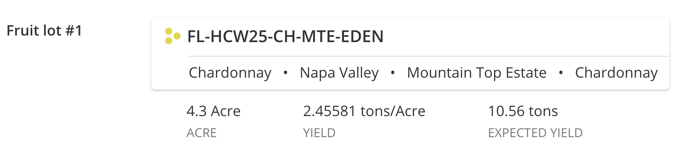
- Expected Yield: After creating or selecting the fruit lot, you’ll see fields for Area, Yield, and Expected Yield. If the vineyard block has an area value entered, InnoVint uses that area along with one of the following as the Expected Yield value — scheduled fruit, historically received fruit, or the crop estimate — in order to calculate the Yield values.
- Choose to create a new fruit lot or select an existing fruit lot.
-
- (optional) Sugar Reading: Enter the harvest sugar reading to display as the last brix or baume for the fruit lot in the Fruit Intake Report (**CA Winemakers: This will be very helpful for the California Grape Crush Report!). This entry can also be edited or deleted at any time after the action is recorded.
- Next, enter your net Fruit Weight.
- Click on + Add fruit lot under the Fruit Lots header if you would like to receive fruit for additional fruit lots on the same weigh tag.
- Click on

Note: The recorded date and time of the Receive Fruit action is different than the Time of arrival. To match the recorded date and time with the Time of arrival, the action may need to be backdated.
Using Advanced Receive Fruit
Advanced Receive Fruit actions are similar to the Simple action, but have additional fields and functionality. The Advanced Receive Fruit feature requires activation. Compare the Simple and Advanced options here and find detailed instructions on activation in this article.
- If you have Multi Weight Locations activated, select your Weighing location. Otherwise, you will not see this field, and this will default to your weighing address from your Harvest Settings on the weigh tag.
- Time of arrival defaults to the current date and time. Change this if necessary (i.e. if you are backdating the action).
- Weigh tag
- The weigh tag number will be generated by InnoVint when the action is completed.
- Choose your deputy weighmaster, if more than one at your facility.
- (Optional) Enter the truck license and trailer license.
- To enter multiple trailer licenses, enter a comma and space between each to separate them and have them display properly on your weigh tag:


- To enter multiple trailer licenses, enter a comma and space between each to separate them and have them display properly on your weigh tag:
- Use the Notes field to append any text or information you want to appear on the generated weigh tag.
- Fruit lots
- Choose to create a new fruit lot or select an existing fruit lot.
Expected Yield: After creating or selecting the fruit lot, you’ll see fields for Area, Yield, and Expected Yield. If the vineyard block has an area value entered, InnoVint uses that area along with one of the following as the Expected Yield value — scheduled fruit, historically received fruit, or the crop estimate — in order to calculate the Yield values. - (optional) Sugar Reading: Enter the harvest sugar reading to display as the last brix or baume for the fruit lot in the Fruit Intake Report (**CA Winemakers: This will be very helpful for the California Grape Crush Report!). This entry can also be edited and deleted at any time after the action is recorded.
- Weighing groups. Click on +Add group to activate the slide-over for data entry.
- Select your tare container and number of containers to calculate the tare for your weigh group. Find out about presetting your tare container weights in Weigh tag Settings.
- Enter the gross weight to calculate the fruit weight.
- Click on
 to keep the slide-over open and pre-populate the tare container selection. Click on
  to save and exit the slide-over.
- To add a second tare container to the same weigh group, click on +Add container. You can use this in conjunction with the "Custom tare container" to use a truck scale and record the truck weight, or combine other tare containers, such as lugs and pallets into a single weigh group.

- To receive fruit for additional fruit lots on the same weigh tag, click on +Add fruit lot under the Fruit lots header. Choose/create you fruit lot(s) and enter the weighing groups. All fruit lots on the same task will appear on the same weigh tag.
- Choose to create a new fruit lot or select an existing fruit lot.
- Summary
- Double check your Net, Gross, and Tare weights for each fruit lot.
- Click on
 .
.
Note: The recorded date and time of the Receive Fruit action is different than the Time of arrival. To match the recorded date and time with the Time of arrival, the action may need to be backdated.

Any edits made to the Receive Fruit action (fruit lot or weigh tag fields) after the action is recorded will cause the original weigh tag number to be voided. InnoVint will regenerate a new weigh tag with the next consecutive number.
Schedule & Receive via Work Order
Creating a work order with a Receive Fruit task allows you to create a fruit schedule. Find out more about how to see and schedule fruit here!
How to Create a Receive Fruit Work Order
To create a Receive Fruit work order, start a new work order:
- In the top Nav bar via the Create work order button/menu
- In the Work Order Explorer, via the +Create work order button
- In the Vineyard OR Fruit Lot Explorers, via the blue Receive weight button

- On the Harvest Launchpad, via the +Create work order button
Add a Receive Fruit task

Populate the required task fields
Creating a task with Advanced Receive Fruit is very similar to creating one with Simple Receive, with a single additional field.
- Advanced Receive only. If you have Multi Weight Locations activated, select your Weighing location. Otherwise, you will not see this field, and this will default to your weighing address from your Harvest Settings on the weigh tag.
- Enter the Expected time of arrival. The expected date will default to the due date for the work order at the bottom of the page.
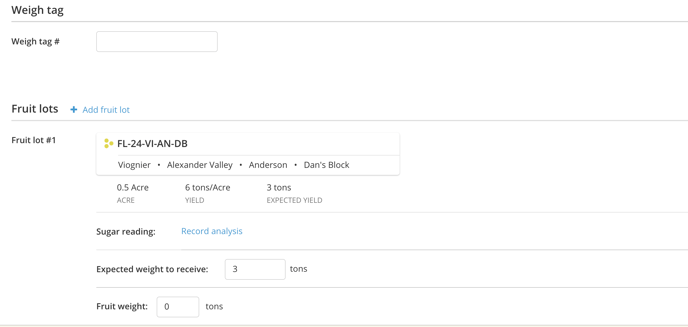
- Select Fruit lots. Choose to Create a new fruit lot code or to Receive Fruit on an existing lot.
• Expected Yield: After creating or selecting the fruit lot, you’ll see fields for Area, Yield, and Expected Yield. If the vineyard block has an area value entered, InnoVint uses that area along with one of the following as the Expected Yield value — scheduled fruit, historically received fruit, or the crop estimate — in order to calculate the Yield values.
• To schedule other fruit lots that you plan to receive and record on the same weigh tag, click on +Add fruit lot under the Fruit lots header. - Enter the expected weight. If the Expected Yield (above) is accurate, you can consider "Applying expected yield from block," and InnoVint will populate the Expected Yield for you.
Create the Work Order!
Don't forget to give your work order a title and assign it to someone. Select the due date as the date you expect to receive fruit. Finally, click on ![]()

How to Complete a Receive Fruit Work Order
Completing Advanced Receive Fruit tasks is similar to completing Simple tasks, but there are more additional fields and functionality.
- Advanced Receive Only. Review the Weighting Location.
- Adjust the Time of arrival, if necessary
- Weigh tags
- Simple Receive only. Enter your weigh tag number.
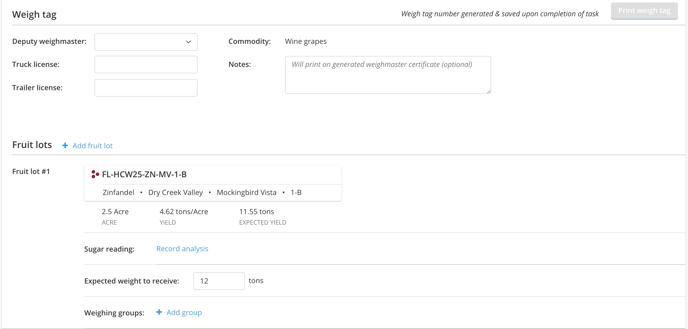
- Advanced Receive only. Complete the Weigh tag section. The weigh tag number will be generated by InnoVint when the action is completed.
• Choose your deputy weighmaster, if more than one at your facility.
• (Optional) Enter the truck license and trailer license. To enter multiple trailer licenses, enter a comma and space between each to separate them and have them display properly on your weigh tag:
• Use the Notes field to append any text or information you want to appear on the generated weigh tag.
- Fruit Lots. To receive fruit for additional fruit lots on the same weigh tag, click on +Add fruit lot under the Fruit lots header. All fruit lots on the same task will appear on the same weigh tag.
- (optional) Sugar Reading: Enter the harvest sugar reading to display as the last brix or baume for the fruit lot in the Fruit Intake Report (**CA Winemakers: This will be very helpful for the California Grape Crush Report!). This entry can also be edited or deleted at any time after the action is recorded.
- Record your fruit weight
- Simple Receive only. Enter the net Fruit Weight received.
- Advanced Receive only. Enter your weigh groups for each Fruit lot.
- Click on +Add group to activate the slide-over for data entry.
- Select your tare container and number of containers to calculate the tare for your weigh group. Find out about presetting your tare container weights in Weigh tag Settings.
- Enter the gross weight to calculate the fruit weight.
- Simple Receive only. Enter the net Fruit Weight received.
-
- Click on
 to keep the slide-over open and pre-populate the tare container selection. Click on
  to save and exit the slide-over.
- To add a second tare container to the same weigh group, click on +Add container. You can use this in conjunction with the "Custom tare container" to use a truck scale and record the truck weight, or combine other tare containers, such as lugs and pallets into a single weigh group.

- Double check your Net, Gross, and Tare weights for each fruit lot.
- Click on
9. Complete task: click on ![]()
Any edits made to the Receive Fruit action (fruit lot or weigh tag fields) after the task is submitted will cause the original weigh tag number to be voided. InnoVint will regenerate a new weigh tag with the next consecutive number.
How to Receive Fruit without a Weigh Tag
** This method is only recommended if you have the Advanced Receive Fruit system activated and do not want to generate a weigh tag number in InnoVint. Without the Advanced Receive Fruit system, we recommend receiving fruit via the method outlined above for Simple Receive Fruit.
** Want to receive fruit with a weigh tag to sell? Check out this article.
Use the Fruit Weight Adjustment action to receive fruit on a created Fruit lot without a weigh tag.

Note: Fruit Weight Adjustments are not reflected on the Fruit Intake Report, although a positive weight adjusted will be reflected on the TTB Report, Part IV Summary of Materials Received and Used in Column (a): UNCRUSHED (Pounds) on Line 2 as "Received."
Costing: Fruit Weight Adjustments have no bearing on direct fruit costs (ie costs applied directly to the block via Vineyard Contract, Fruit Cost Worksheet, or in the Block Details page). To apply direct fruit costs to a lot, you must use the Receive Fruit action. To apply costs to fruit that is entered in InnoVint through a Fruit Weight Adjustment, record a cost item on the fruit lot.
Edit/Delete/Void a Weigh Tag
The Receive Fruit action not only records the total weight received on each Fruit lot (to populate the Fruit Intake Report), but it also tracks the total fruit received per vineyard block. To adjust the weight on this report or to correct a mistake on an InnoVint-generated weigh tag, changes need to be made on the Receive Fruit action.
Simple Receive Fruit action
To correct a mistake, the Receive Fruit action may be edited, or deleted and re-recorded. Find out about how to edit an action here. To delete the Receive Fruit action, no other movement actions (e.g. process to gallons/tons) may be recorded after it, or they will need to be deleted first. At the top of the Action details page, click on View dependent actions list to see what actions will need to be deleted before you can delete and re-enter the Receive Fruit action.
If editing or deleting the Receive Fruit action is not possible, we recommend recording a Weight Transfer or Weight Adjustment to amend the tonnage outside of the Receive Fruit action. Or simply leaving a note on the action of the correct weight if the lot has since been pressed. Weight transfers/adjustments do NOT adjust weights in the Fruit Intake Report, which reflects the record on the Receive Fruit action.
Advanced Receive Fruit action
While a Receive Fruit action created with Advanced Receive Fruit activated may be edited or deleted, editing or deleting the action will generate a new weigh tag number for the fruit receipt. The original weigh tag number from an edited or deleted action will be marked as Void.
Any new weigh tags will continue to be numbered in sequential order following the last created weigh tag.
Due to CDFA regulations on weighmaster certificates, once a weigh tag is generated in InnoVint and the weigh tag number established, it cannot be edited or deleted, only voided.
You can find all weigh tags, including any voided weigh tags in the Fruit Intake Report (clear the Voided filter in order to surface voided weigh tags).
