Welcome to our InnoApp Work Orders! This is the next step to providing our users a single source of mobile access to InnoVint.
So, what's included on the InnoApp work orders? Get the lowdown here! You can start, complete and submit work orders - work order creation is not yet supported.
It's true! Work Orders have full offline support. Find out more here!
Find your Work Orders
Find work orders via the Work Order explorer on your homescreen.
Use the Search bar to search by text (in the work order title) or work order number (any portion of it).
Use the Work Orders Filter at the top right of the explorer to choose between "My open work orders", "My submitted work orders", "All open work orders", or "All submitted work orders."


In the work order explorer, if any task in a work order is started, the work order will have a STARTED tag; if all tasks in a work order are completed, the work order will have a COMPLETED tag. If no tasks are started, then it will have a NOT STARTED tag.

What Tasks are included?
InnoApp allows you to complete and submit all standard work order tasks:
Addition, Analysis, Pull sample for ETS, Blend, Barrel Down, Rack and Return, Rack, Topping, Top Off, Transfer, Filter, Bottle, B2B Transfer In/Out, Bottle en Tirage (with the Sparkling module activated), Custom tasks, and all Harvest tasks (Receive Fruit, Process Fruit to Volume & Weight, Bleed/Saignee, Drain and Press, and Cap Management/Fermentation tasks).
If you find a task that is not supported, you will see a message advising you that it is under construction. This will not impact other tasks within the same work order. You will still be able to complete and submit any other supported tasks without issue.
Navigating Work Order Tasks
We've mirrored most of the functionality that exists on the Desktop App in our InnoApp work order tasks.
Within each work order, you can:
1. View work order details
Assigned user, due date, work order ID, owners (when relevant) and the included tasks.
2. Re-assign work orders
Tap on the "assigned to" field, and select a different user. If you do not see the blue dotted line below the existing user, then you do not have permissions to re-assign the work order:


3. Delete work orders
Use the Edit button on the work order details page to fully delete a work order. This feature is available to users based on user permissions and the account's work order edit settings (setting on the desktop app).
-
If the work order edit setting is set to Default, then only Admins or the work order creator can edit or delete a work order.
-
If the second radio button is selected, then Admins, Team Members, and Team Members Cannot Submit can all edit and delete work orders - also dependent on owner permissions.


Within each task, you can:
1. View the Task Details
After you click into your work order task, view the summaries of lots, vessels and volume changes.
This is where you can begin to input data on a specific task.
In this Task details screen, you will find your options to Start, Complete and Submit tasks at the bottom right of the screen. Use the More menu at the bottom left of the screen to SKIP a task if it is unstarted, to UNSTART a task if it is started, or to UNCOMPLETE a task, if it is completed. You will not see the More menu here after task submission.

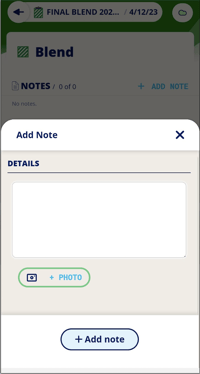
2. Add Notes
Add your written notes, or a photo note using + Add Note at the top of any task. Tap All Notes if you need to add more.


3. Input Lot and vessel data
Tap any involved lot on the task details page to view a screen with the lot details. You will see the total requested volume change on the lot, and the number and type of vessels included for the lot.
If all lot vessels have not been added to the task at work order creation, this screen does not show you the total number of vessels for the lot. This screen shows you only the number of vessels added at work order creation.
Depending on the task, this is where you will update vessels (add or remove), input vessel volumes or additive quantities.
-
- View task name and due date

- See net lot volume change, the total number of involved vessels for the lot, and vessel check off summary
- Tap any white cell to enter a specific volume per vessel
- Use the Bulk fill option by tapping the blue header title in either Remove or Ending Fill columns, as applicable for the task
- Are you using dip charts? Find them in the blue Ending Fill header link. See the next section for more details on accessing charts and entering tank measurements.
Only white input fields are available for data entry per each vessel.
- If you do not see white data entry fields, then data entry may not be available on the app, or the task maybe already completed.
- Tap on the 3 white dots at the bottom right Quick menu to remove vessels, add more vessels, scan to check off barrels, or update vessel information (available options depend on the task type).

- Click on "Update vessel information" to quickly update vessel locations or tags on all vessels without re-scanning. This information is updated as soon as it is saved, regardless of the task submission status.

- Click on "Update vessel information" to quickly update vessel locations or tags on all vessels without re-scanning. This information is updated as soon as it is saved, regardless of the task submission status.
- View task name and due date
4. Use dip charts
In InnoApp, find dip chart entry fields on either Unstarted or Started tasks by toggling on Show dip chart inputs from the Ending fill column bulk options menu.
- After toggling on dip chart inputs, InnoApp will automatically display the measurement based on the existing ending fill volume.
- Enter a new measurement and tap anywhere on the screen to see the calculated volumes update in the Add column, and in the total lot volume for the task.


- InnoApp will always display the type of dip (wet or dry), as well as a warning if you enter a measurement outside the range of the chart:

- After you tap on Complete task, the measurement will be saved as volume and you will not be able to view the current dip.
- While you are working with a task, the selected input type will be saved, i.e. if you toggle back to Show volume inputs, the next time you enter the task, the tank will show volumes. If you toggle to Show dip chart inputs, the next time you enter the task, the tank will show measurements.
The option to Show dip chart inputs is only available for tanks with existing dip charts. This option will not display for vessels other than tanks ("vessel type" = tank) or tasks displaying lot weights rather than volume.
Dip charts will not populate when using the "Add/Remove" volume column - only for the "Ending fill" column.
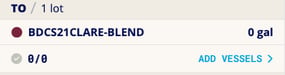
5. If you "Let cellar staff choose vessels"
If you created the work order with "Let cellar staff choose vessels," you will see the task detail for the lot look like this, with the link to Add vessels:
- Tapping Add vessels automatically opens the scanner for you to add vessels via QR code scanning.
- If you want to search for vessels instead, tap Cancel on the scanner screen, and then Cancel on the Select Vessels screen. Next, select the Quick Menu to Add vessels via search:


InnoApp doesn't currently support adding vessels to Addition tasks. Please add vessels when creating the task via the Desktop app. We recommend putting in a small placeholder Additive quantity, which can be communicated via Notes on the work order and amended by the cellar in the task. Find out more about Addition tasks in InnoApp here.
6. Use the new Vessel Check Off Feature
In the Lot details screen, use this tap or scan feature to allow cellar staff to track which vessels have been emptied, topped, filled or received additions.
In the Lot details screen, check off vessels as completed by tapping the edge of the screen, to the left of the vessel, or use the more menu (three white dots) to access the "Scan to check off" function. You will see a green checkmark against individual vessels as they are checked off.


A green checkmark will display on the task summary screen once all vessels are checked off (i.e. BDCH20RESERVE-PL in the screenshot below) or you will see the number checked off of the total, (i.e. 4/58 with a grey checkmark for BDCH22SYVCT-B).

InnoApp will show a warning when checking off vessels in work orders when the vessel is currently in a different lot, although it will still check off that vessel.

Want to restrict vessel checkoff to scan-only?
For wineries that prefer added control, admins can enable Scan only mode to help prevent accidental tapped check-offs during work order execution. When this setting is enabled, vessels can only be checked off by scanning the vessel’s QR code — tapping to check off is disabled.
This provides extra assurance that vessels are intentionally verified in the cellar while keeping all other work order check-off behavior the same.
-
This is a winery-wide setting
-
Only Admins can change it
-
Default behavior remains Scan and tap
Admins can find this setting under:
Settings → InnoApp Work Orders → Vessel check-off

Work Order Submission
What can I submit?
Users can submit work order tasks and work orders on the App with the same flexibility as on the desktop app, using the Individual task submit model (our old iOS Work Order app requires you to submit all tasks at once).
When can I submit?
InnoApp work orders support all three submit "as of" variants: as of "Now", as of a "Specific date and time", and as of the "Task completion time".


These three variants are available at the task level to submit individual tasks, and also at the work order level, to submit the entire work order.
How do Work Orders work offline?
Get prepped before you walk into the cave!
You can view and complete work orders offline, BUT you must either favorite the work order or have recently loaded it. Otherwise you will see this:

Add to your favorites by tapping the Favorite icon on the work order (or lot, or vessel, or vineyard!), and you'll see it in your favorites list on your home page, and it will also load as normal via the Work Order explorer:


This also works if you fully loaded a work order and the tasks on your device recently (confirm it's there on your homescreen, under Recents), in order to access the work order offline.


If you log out of InnoApp, your favorites and recents will reset.
Find out more about favorites and recents here.
Current offline functionality includes only one "task status change" for a work order task. This means that you can move a task to started while offline, or from started to completed while offline, but not both. You may encounter difficulties if you move from unstarted to started to completed while offline - that is two "status changes". Stay tuned for more developments!
Feedback
Tell us what you love and what you don't like - or what doesn't seem to work:
Please send this feedback via InnoApp, using the "Give Feedback" button at the bottom of the home screen.
