The Analysis Import action allows you to import analysis data in bulk via a csv file for one or more lots or vessels. The csv must match one of two formats outlined in this article, and we recommend starting with one of the templates provided.
This article covers:
Using the Analysis Import
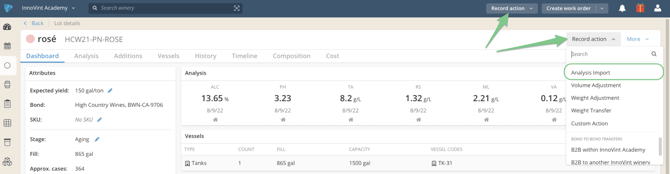
- Analysis Import is completed via a direct action called "Analysis Import", and can be accessed via the Record action menu on either the top navigation bar or the Lot Details page.
- Select an Analysis source from the drop-down list. If the source is not listed or unknown, choose Not specified. This source applies to the entire file.

- Choose a csv file to import. The csv template format and column headers must meet very specific requirements. Download a sample template and review format guidelines here. Choose your template format based on how you receive your existing lab results.
You can choose the "Original Analysis Import" with one row and multiple analyses per lot:
or, the "Modified Analysis Import", with one row per analysis result per lot or vessel:
- After selecting the file, you will be able to review the data to be imported:
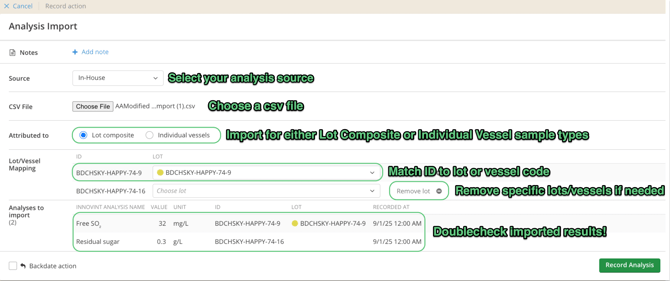
- Select whether to attribute your analysis data to lot composite(s) or individual vessel(s). The file's "Performed on" or "ID" field data will trigger InnoVint to select Lot Composite (if it finds Lot Codes) or Individual Vessel (if it finds Vessel codes).
- Match the ID to the Lot Code in InnoVint, if necessary. If you need to remove a lot or vessel from the import, you can do it here.
- Double check the Analysis data to be imported.
- Click "Record Analysis".
Note: You can choose to import analysis data for different dates and times within the same csv file. (Note: The Date column is entirely is optional.)
Both Analysis templates will also support a timestamp (MM/DD/YY 00:00).
![]()
Backdating the import action will override any dates and times specified in the file.
Note: The Analysis Import feature does not allow you to import data for lot composites and individual vessels in the same file.
How to edit or delete imported data
To delete all the analyses from a single import:
Go to the Winery Activity Feed:
![]()
Choose the Analysis Import action that you would like to delete. (Tip: Filter for all Analysis actions to narrow your search).

Click on the action, and then in the Action details page click on ![]() in the top right corner. This will delete all analyses recorded via the import action.
in the top right corner. This will delete all analyses recorded via the import action.
To delete individual analyses
Go to the Lot details page and on the Lot Analysis tab, choose All analyses in a list.
![]()

You will see a confirmation screen before deleting the analysis:

To edit individual analyses:
Go to the Lot details page and on the Lot Analysis tab, choose All analyses in a list.
![]() The Edit option (next to Delete) allows you to change the analysis value or recorded date/time. To change any other attributes (e.g. source, or analysis type), you will need to delete the entire import action and re-import the analyses with the correction.
The Edit option (next to Delete) allows you to change the analysis value or recorded date/time. To change any other attributes (e.g. source, or analysis type), you will need to delete the entire import action and re-import the analyses with the correction.

FAQ
Q: I'm getting an error on my import! Why?
A: Make sure to match the file format to our specifications detailed here. If you cannot manage to troubleshoot, please reach out to us at support@innovint.us.
Q: Can I import Vineyard Block Analysis?
A: We do not currently allow importing vineyard analyses. For now - the fastest way to enter the analysis currently is to do so manually but to utilize the "Record and add another" button to make quick work of it,

Or else InnoApp makes this a pretty quick process as well.