The Move and Deplete inventory actions allow you to easily update your current inventory across locations. This article covers:
- How to Move Inventory
- How to Deplete Inventory or move it to On Order
- How Inventory actions in SUPPLY integrate to Commerce7
How to Move Inventory
The Move inventory action allows you to move inventory between locations and can be accessed:
- From the ‘Record inventory action’ dropdown menu in the top navigation bar
- From the ‘Record inventory action’ dropdown menu in the Inventory by Location widget on the SKU Details Page
- Select the inventory in the Inventory Picker.
If a Move Inventory action is recorded from the SKU details page/Inventory by Location widget, the SKU and location will be pre-selected for the action. - Enter the quantity of inventory to move.
TIP! Use the “Quantity” bulk dropdown menu to enter the current inventory quantity, clear all quantities or apply the same number of groups and items across all SKUs. - Select a location from the Location dropdown menu.
If a Move Inventory action is recorded from the SKU details page/Inventory by Location widget, the location will be pre-selected for the action. - Depending upon the tax status of both the inventory and its location, any changes to the tax status will display under the Tax Status section.
Review the Tax status section to understand how the movement will impact the TTB export (for instance, moving inventory from an in-bond location to a taxpaid location will result in the inventory populating Section B as Remove Taxpaid). See this article on how SUPPLY populates the TTB export. - Click the green ‘Move Inventory’ button.

🚨 Moving inventory between locations may have compliance implications including transfers in bond, taxpaid removals, and taxpaid wine returned to bond. Carefully review the Tax Status section to understand possible compliance changes.
Video Tutorial
How to Deplete Inventory or move it to On-Order
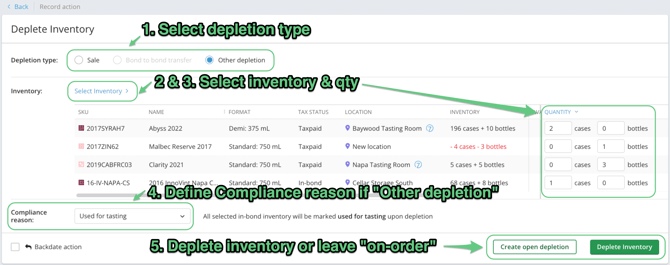
The Deplete Inventory action allows you to remove inventory, or mark it as "On order" with an Open depletion task. It can be accessed:
- From the ‘Record inventory action’ dropdown menu in the top navigation bar
- From the ‘Record inventory action’ dropdown menu in the Inventory by Location widget on the SKU Details Page
How to record a depletion or create an open depletion for "on order" inventory
- Select the depletion type using the radio buttons.
If “Other depletion” is selected, choose the appropriate reason. The reason selected will appropriately populate the correct line on the TTB Report for the depletion of inventory that is in-bond. If you choose 'Compliance reason not set' then this action will not be mapped to any line of the TTB Report, but will be surfaced in the 'Actions with compliance reason not set' section of the TTB export. - Select the inventory in the Inventory Picker.
If a Deplete Inventory action is recorded from the SKU details page/Inventory by Location widget, the SKU and location will be pre-selected for the action. - Enter the quantity of inventory to deplete.
TIP! Use the “Quantity” bulk dropdown menu to enter the current inventory quantity, clear all quantities or apply the same number of groups and items across all SKUs. - Review the tax status or compliance reason section to confirm that everything is correct. See this article on how SUPPLY populates the TTB export.
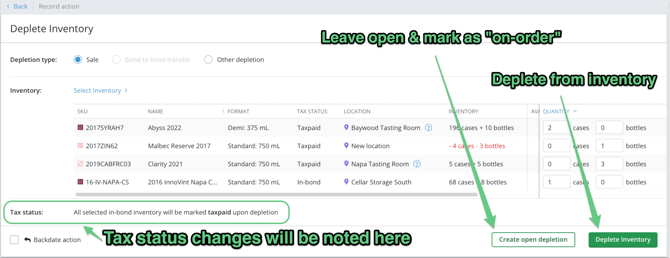
- Decide whether you will a) mark the inventory as "on-order" and create an open depletion, or b) record the depletion now.
-
Choose Create open depletion
Note: You cannot backdate an Open depletion. If the Backdate action is checked, the Create open depletion button will be greyed out.
Creating an open depletion saves the action in an “open” state and adds it to the Open depletions explorer. -
Choose the the green ‘Deplete Inventory’ button.
Inventory will be depleted as of the time of submission or chosen backdate.
-
🚨 Depleting inventory may have compliance implications including transfers in bond, taxpaid removals, etc. Carefully review the Tax Status or Compliance Reason section to understand possible compliance changes.
Editing or submitting an open depletion
- Navigate to the Open Depletion, via the Open Depletions Explorer.

- Click on the open depletion task from the Open depletions screen. All fields will be open and editable for any changes prior to submission.
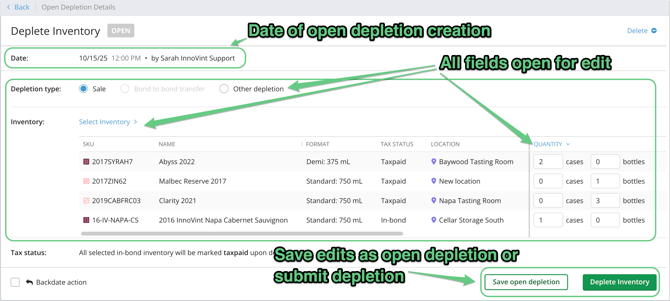
- You may make any desired edits to the selected inventory, quantity or depletion type and Save the open depletion to leave inventory on order.
- When you are ready to fulfill and remove inventory, click the Deplete inventory button:

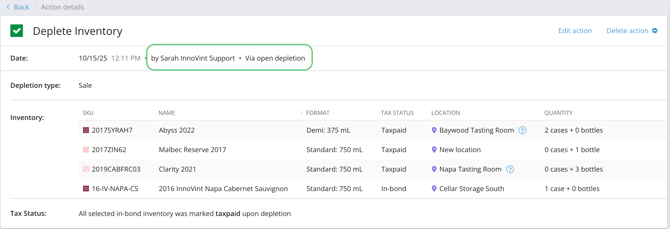
- Upon submission, any inventory that was previously on-order via the action will be depleted and removed from the "On order" status. The action will no longer display in the Open depletions explorer - you will instead find it in your Action History Feed or on the SKU details page with the added description "Via open depletion"!
Want to know more about how "On order" status works? Check out the full article here.
How Inventory actions in SUPPLY integrate to Commerce7
Once a SKU and location in SUPPLY are linked to a product and inventory location in Commerce7, inventory actions recorded in SUPPLY are reflected via inventory transactions on products in Commerce7. The integration from SUPPLY to C7 updates in real-time.
Open depletions created in SUPPLY do not link to C7, and remain "Available for Sale" in C7.

Learn more about how SUPPLY inventory actions update in C7 in this article!
Learn more about On order status works in SUPPLY in this article!