![InnoVintSupportCenter - header.png]](https://support.innovint.us/hs-fs/hubfs/InnoVintSupportCenter%20-%20header.png?width=300&height=22&name=InnoVintSupportCenter%20-%20header.png)
For SUPPLY customers using Orders and QuickBooks Online, there can be duplicated data entry required — once in SUPPLY to create an order, and then again in QuickBooks Online (QBO) to create an invoice. That's time-consuming, and it's easy for the two records to drift apart.
This feature lets you export order details from SUPPLY into a file that you can import straight into QuickBooks Online to create invoices — so you only have to enter the order once. It's a great way to close the gap between order management and invoicing.
This article covers
What is QuickBooks export/import?
The QuickBooks export/import feature creates a file from one or more SUPPLY orders that you can import directly into QuickBooks Online to generate invoices.
This is a one-way, on-demand export — not a live sync. You'll generate an export from SUPPLY whenever you're ready to invoice, and then import that file into QuickBooks Online.
This feature is being rolled out gradually and may not yet be available on every SUPPLY account. If you don't see the options described below, contact InnoVint Support to check availability for your account.
Getting Started
Before you begin:
This feature works with QuickBooks Online. QuickBooks Desktop is not compatible.
Mapping SKUs and Customers:
Your first step is mapping SKUs and customers between SUPPLY and QBO.
SUPPLY and QuickBooks don't always have the same names for the same SKU or customer. Before your export will import successfully, each SKU and customer that's named differently in QuickBooks needs to be mapped into SUPPLY. If you use categories or sub-categories for Quickbooks customers and/or SKUs, make sure to read these instructions for mapping names properly!
If your names already match
You don't have to do anything. When a QuickBooks name is left blank in the QuickBooks field on SKUs or Customers, SUPPLY automatically uses the SUPPLY SKU code (for SKUs) or the SUPPLY customer name (for customers) on the export. If your names in SUPPLY already match to QBO, you are all set!
For customers: be sure to confirm that your SUPPLY Customer name matches the QuickBooks “Display name” field for that customer:
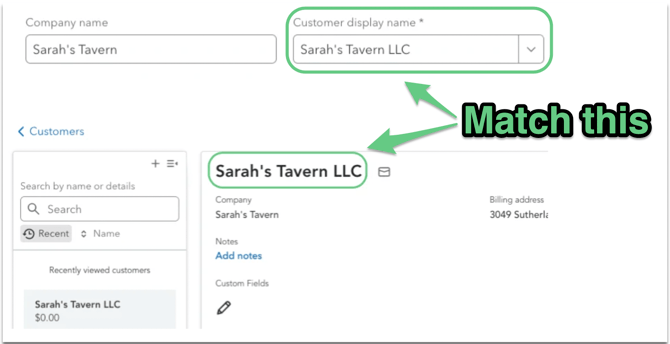
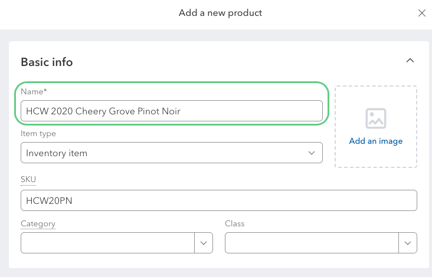
For SUPPLY SKUs and QBO Product/Inventory: it is your QuickBooks' Product name (not SKU) that must be mapped to the SUPPLY SKU:
If your names are different
You'll need to map them in SUPPLY using either method below — once mapped, every future export for that SKU or customer will use the mapped name automatically.
It doesn't matter whether your QuickBooks items are tracked as inventory or non-inventory — mapping works the same way for both.
Method 1 - map new SKUs as you go: Add QuickBooks names when you create new SKUs and customers:
SKUs
When you add a new SKU, you'll see a QuickBooks SKU field near the bottom of the Add SKU form.
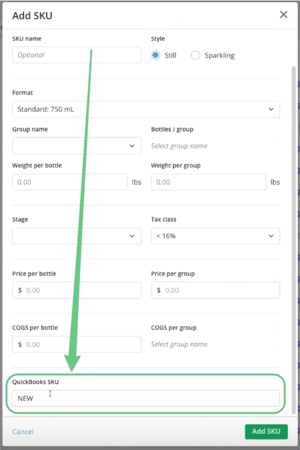
- It's pre-filled with the SUPPLY SKU code automatically — edit or clear it if your QuickBooks item is named something else.
- You can update it later from the SKU details page (look for the pencil/edit icon next to QuickBooks SKU name).
Customers
Likewise, when you add a new customer, you'll see a QuickBooks Customer Name field on the Add Customer form.
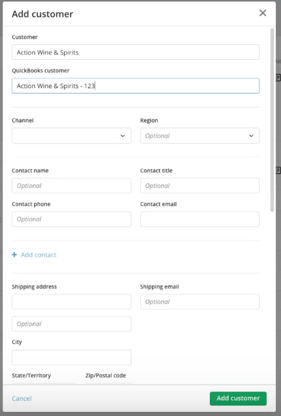
- It's pre-filled with the customer name automatically — edit or clear it if needed.
- You can update it later from the customer details page (pencil/edit icon next to QuickBooks customer name).
Note: If no QuickBooks name is set, the SKU or customer details page will show “No name” — that just means SUPPLY will fall back to the SUPPLY SKU code or customer name at export time.
Method 2 - Map and update QuickBooks names for existing SUPPLY SKUs and customers:
If you already have a full catalog of SKUs and customers in SUPPLY, editing each one individually would take a while. Use the QuickBooks mapping settings instead:
- Go to Settings > QuickBooks mapping
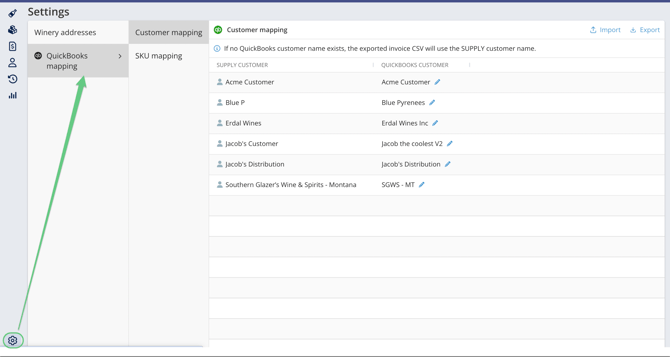
- Choose Customer mapping or SKU mapping. Each page shows a table comparing your SUPPLY name to the current QuickBooks name on file.
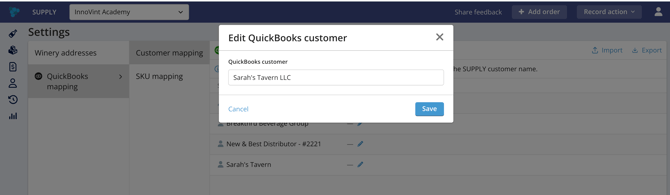
- To edit one or a few at a time: click the edit (pencil) icon next to the name to make your changes, and save.
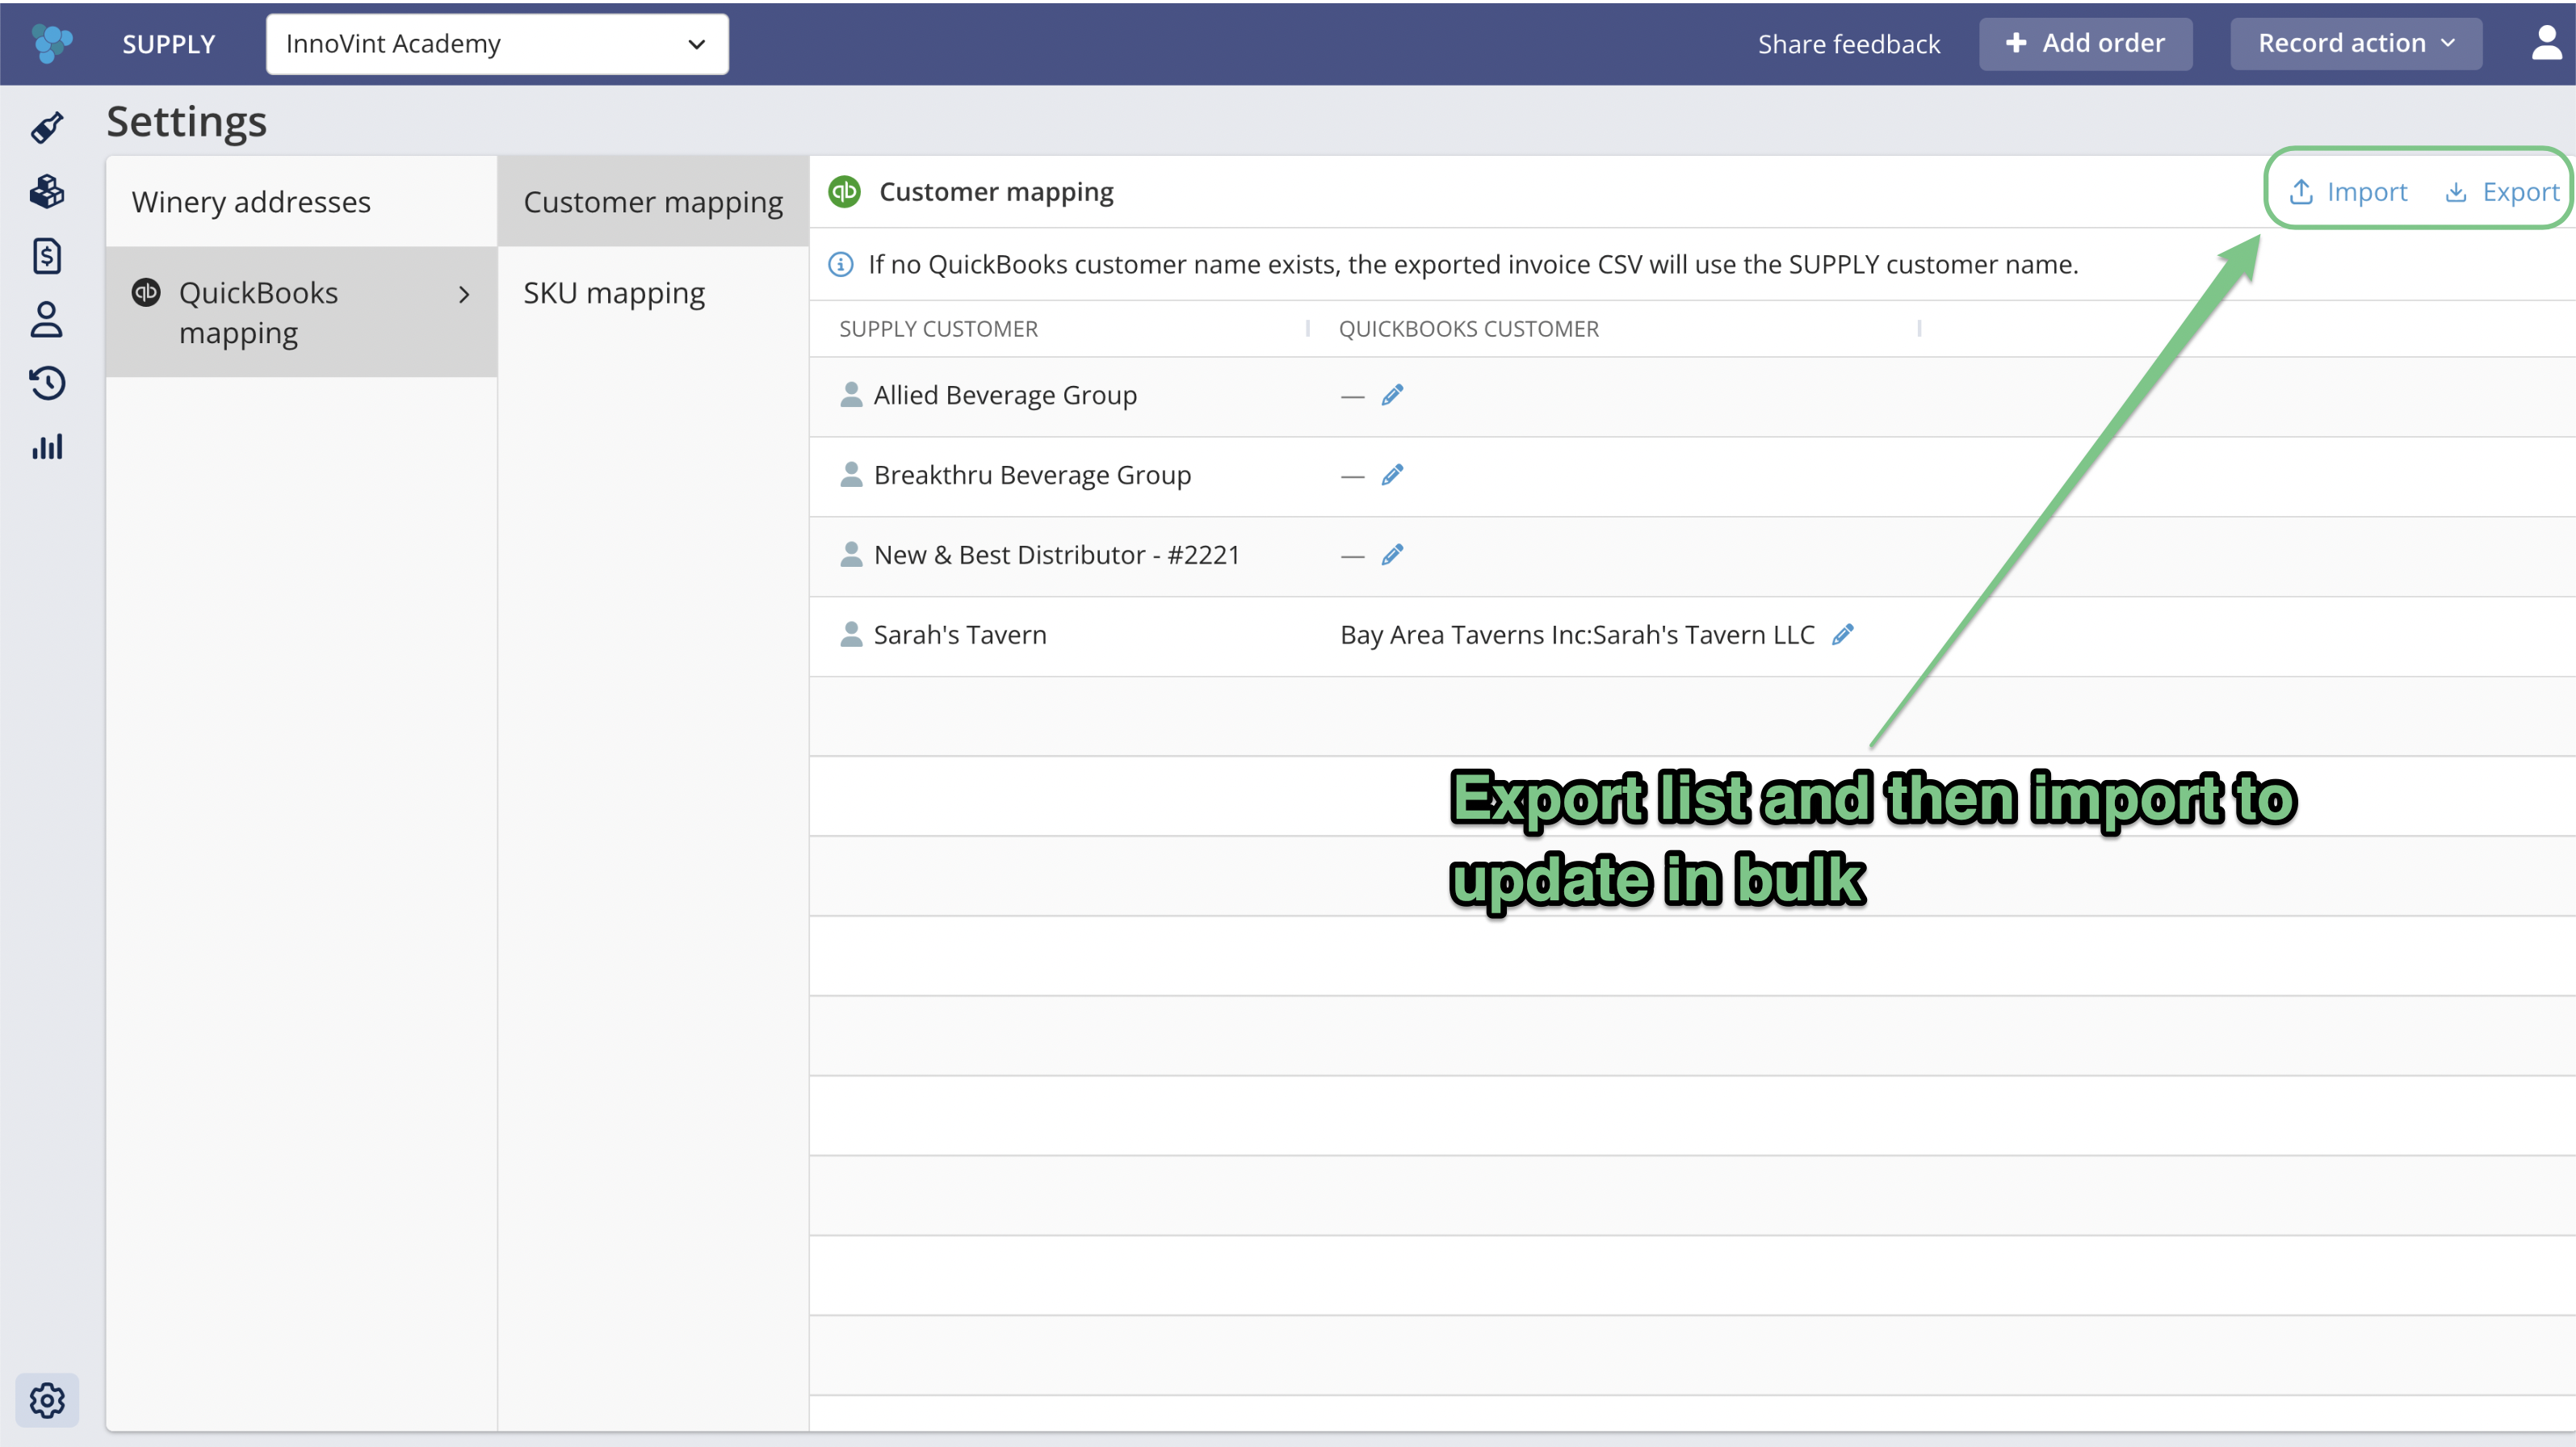
- To update many at once: export the mapping table (a simple Excel file), fill in the QuickBooks name column for each row, and import it back in. The import will flag any errors automatically — for example, a SKU code that doesn't match anything in SUPPLY — so you can correct and re-import
 .
.
If you use categories or sub-categories
If you use categories or sub-categories in QuickBooks, you will need to map customers and SKUs to SUPPLY - even if the names match. SUPPLY's export will not import successfully without mapping the category and sub-category hierarchies for each name.
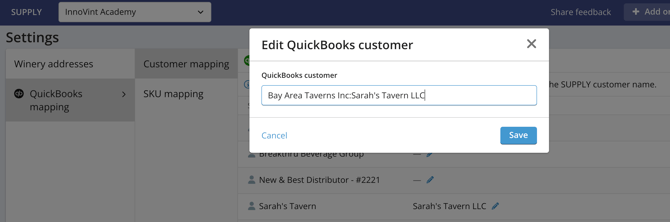
For Customers: You must enter the QuickBooks customer name in the following format: “QuickBooks customer category:QuickBooks customer sub-category:Quickbooks customer name”
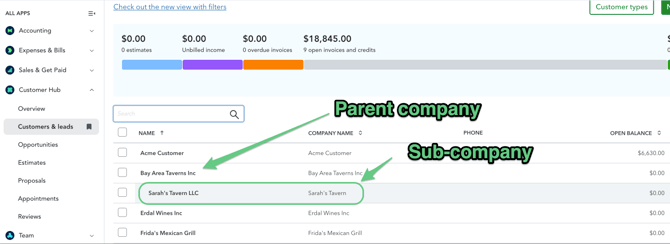
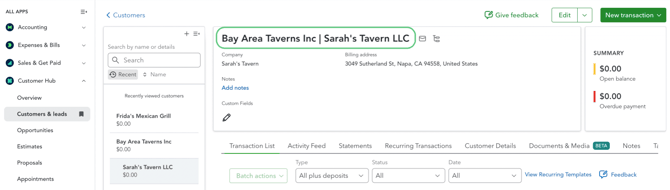
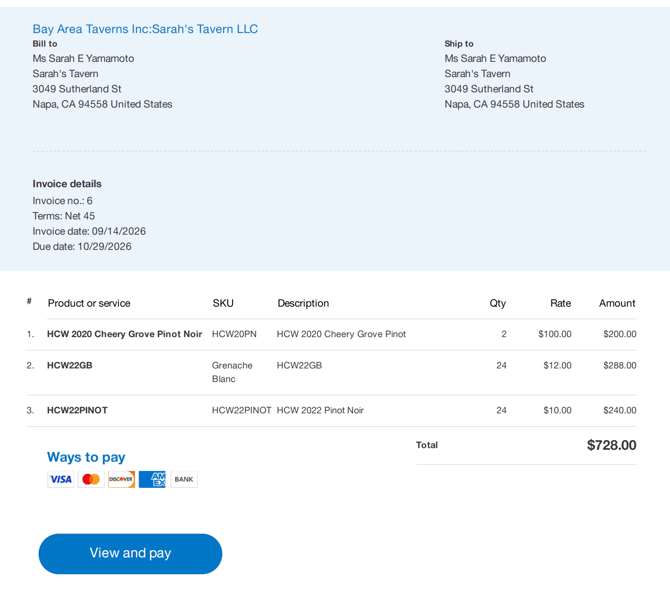
In SUPPLY this customer’s Quickbooks customer name should be entered as “Bay Area Taverns Inc:Sarah's Tavern LLC”
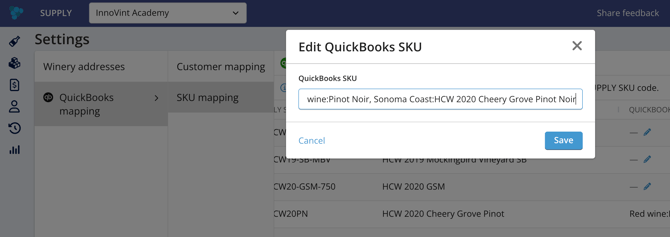
For SKUs: You must enter the QuickBooks product/inventory name in the following format: “QuickBooks product category:QuickBooks product sub-category:Quickbooks product name”
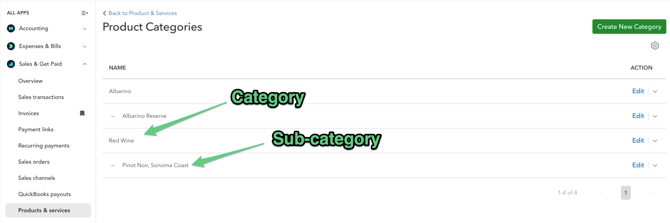
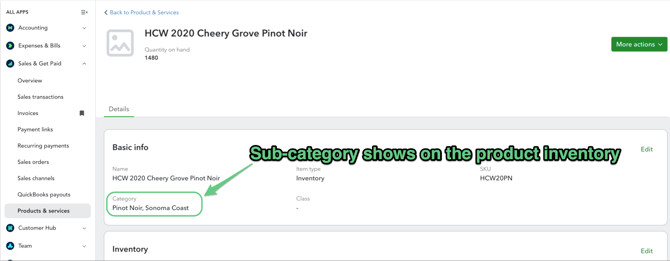
In SUPPLY this SKU's Quickbooks SKU name should be entered as “Red wine:Pinot Noir, Sonoma Coast:HCW 2020 Cheery Grove Pinot Noir”
How to use the QuickBooks export/import
Once your mappings are in place, you're ready to export an order for invoicing:
Create the QuickBooks export from an order
-
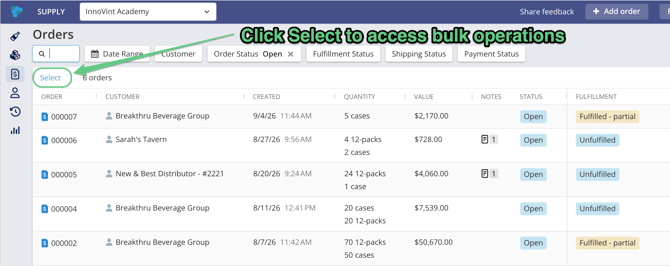
Go to your orders list and click Select, to access the QuickBooks bulk operation
-
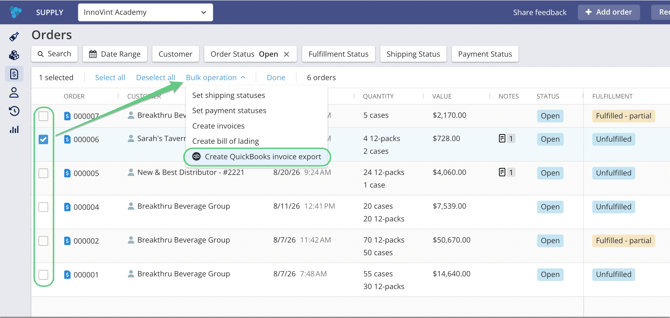
Select the order(s) you want to invoice, then choose Bulk Operations > Create QuickBooks invoice export.
-
Click Download to save the export file (a CSV).
Selecting multiple orders creates a single export file — when you import it into QuickBooks, it will create one invoice per order.
Order quantities are converted to bottles on the export (for example, 10 cases + 2 bottles becomes 122 bottles). This assumes your QuickBooks items are also tracked in bottles.
-
Import the export into QuickBooks Online
In QuickBooks Online:
-
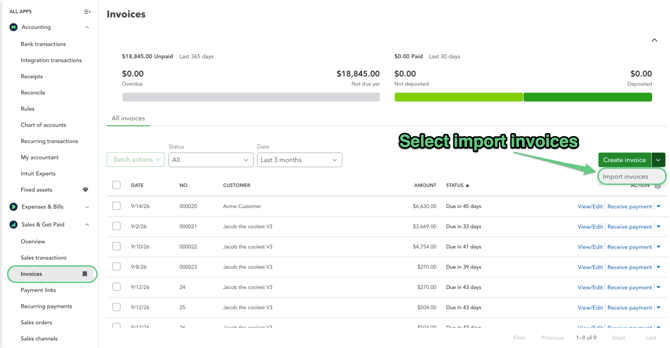
Go to Settings (gear icon) > Import Data > Invoices, or go to Invoices > Create invoice > Import invoices
-
Select the SUPPLY export file and continue.
-
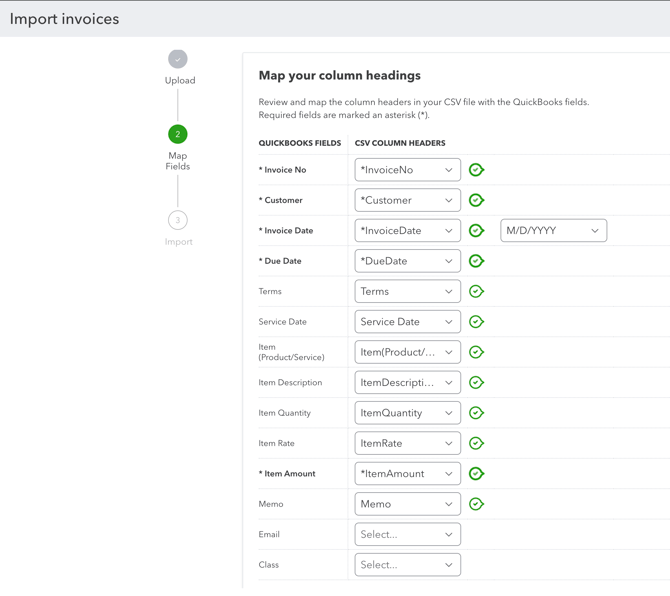
Confirm the field mapping between the CSV columns and QuickBooks' invoice fields (SUPPLY's column headers are designed to map automatically). You should not need to change anything here - just review the date format:
-
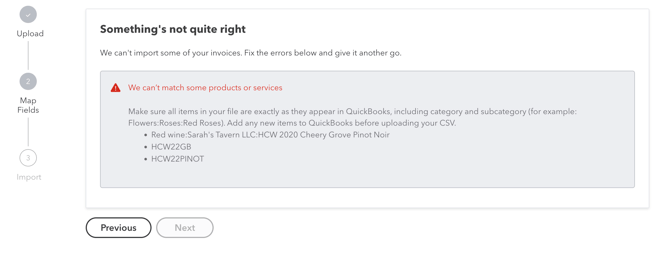
Review any errors flagged by QuickBooks — most commonly this is a customer or SKU/item name that doesn't match anything in your QuickBooks account. If you see errors, fix the mapping in SUPPLY's QuickBooks mapping settings and re-export to try again, or update the name in QuickBooks, then try the import again.
-
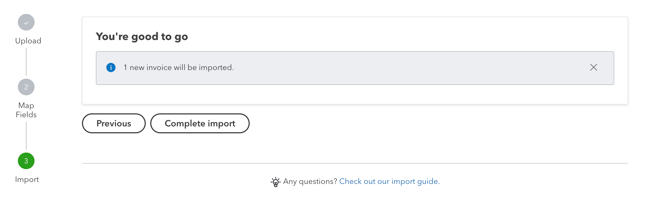
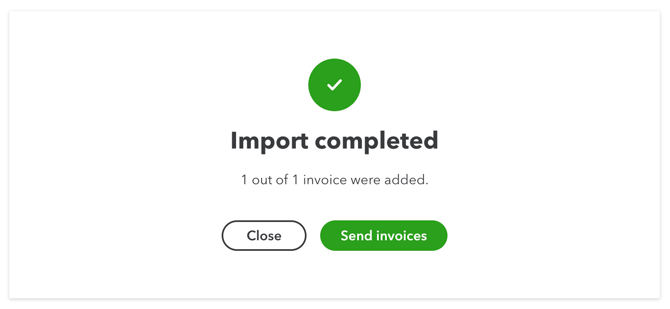
Complete the import. QuickBooks will show you how many invoices will be created, and give you the option to send them right away. You can also edit these after creation in QBO.
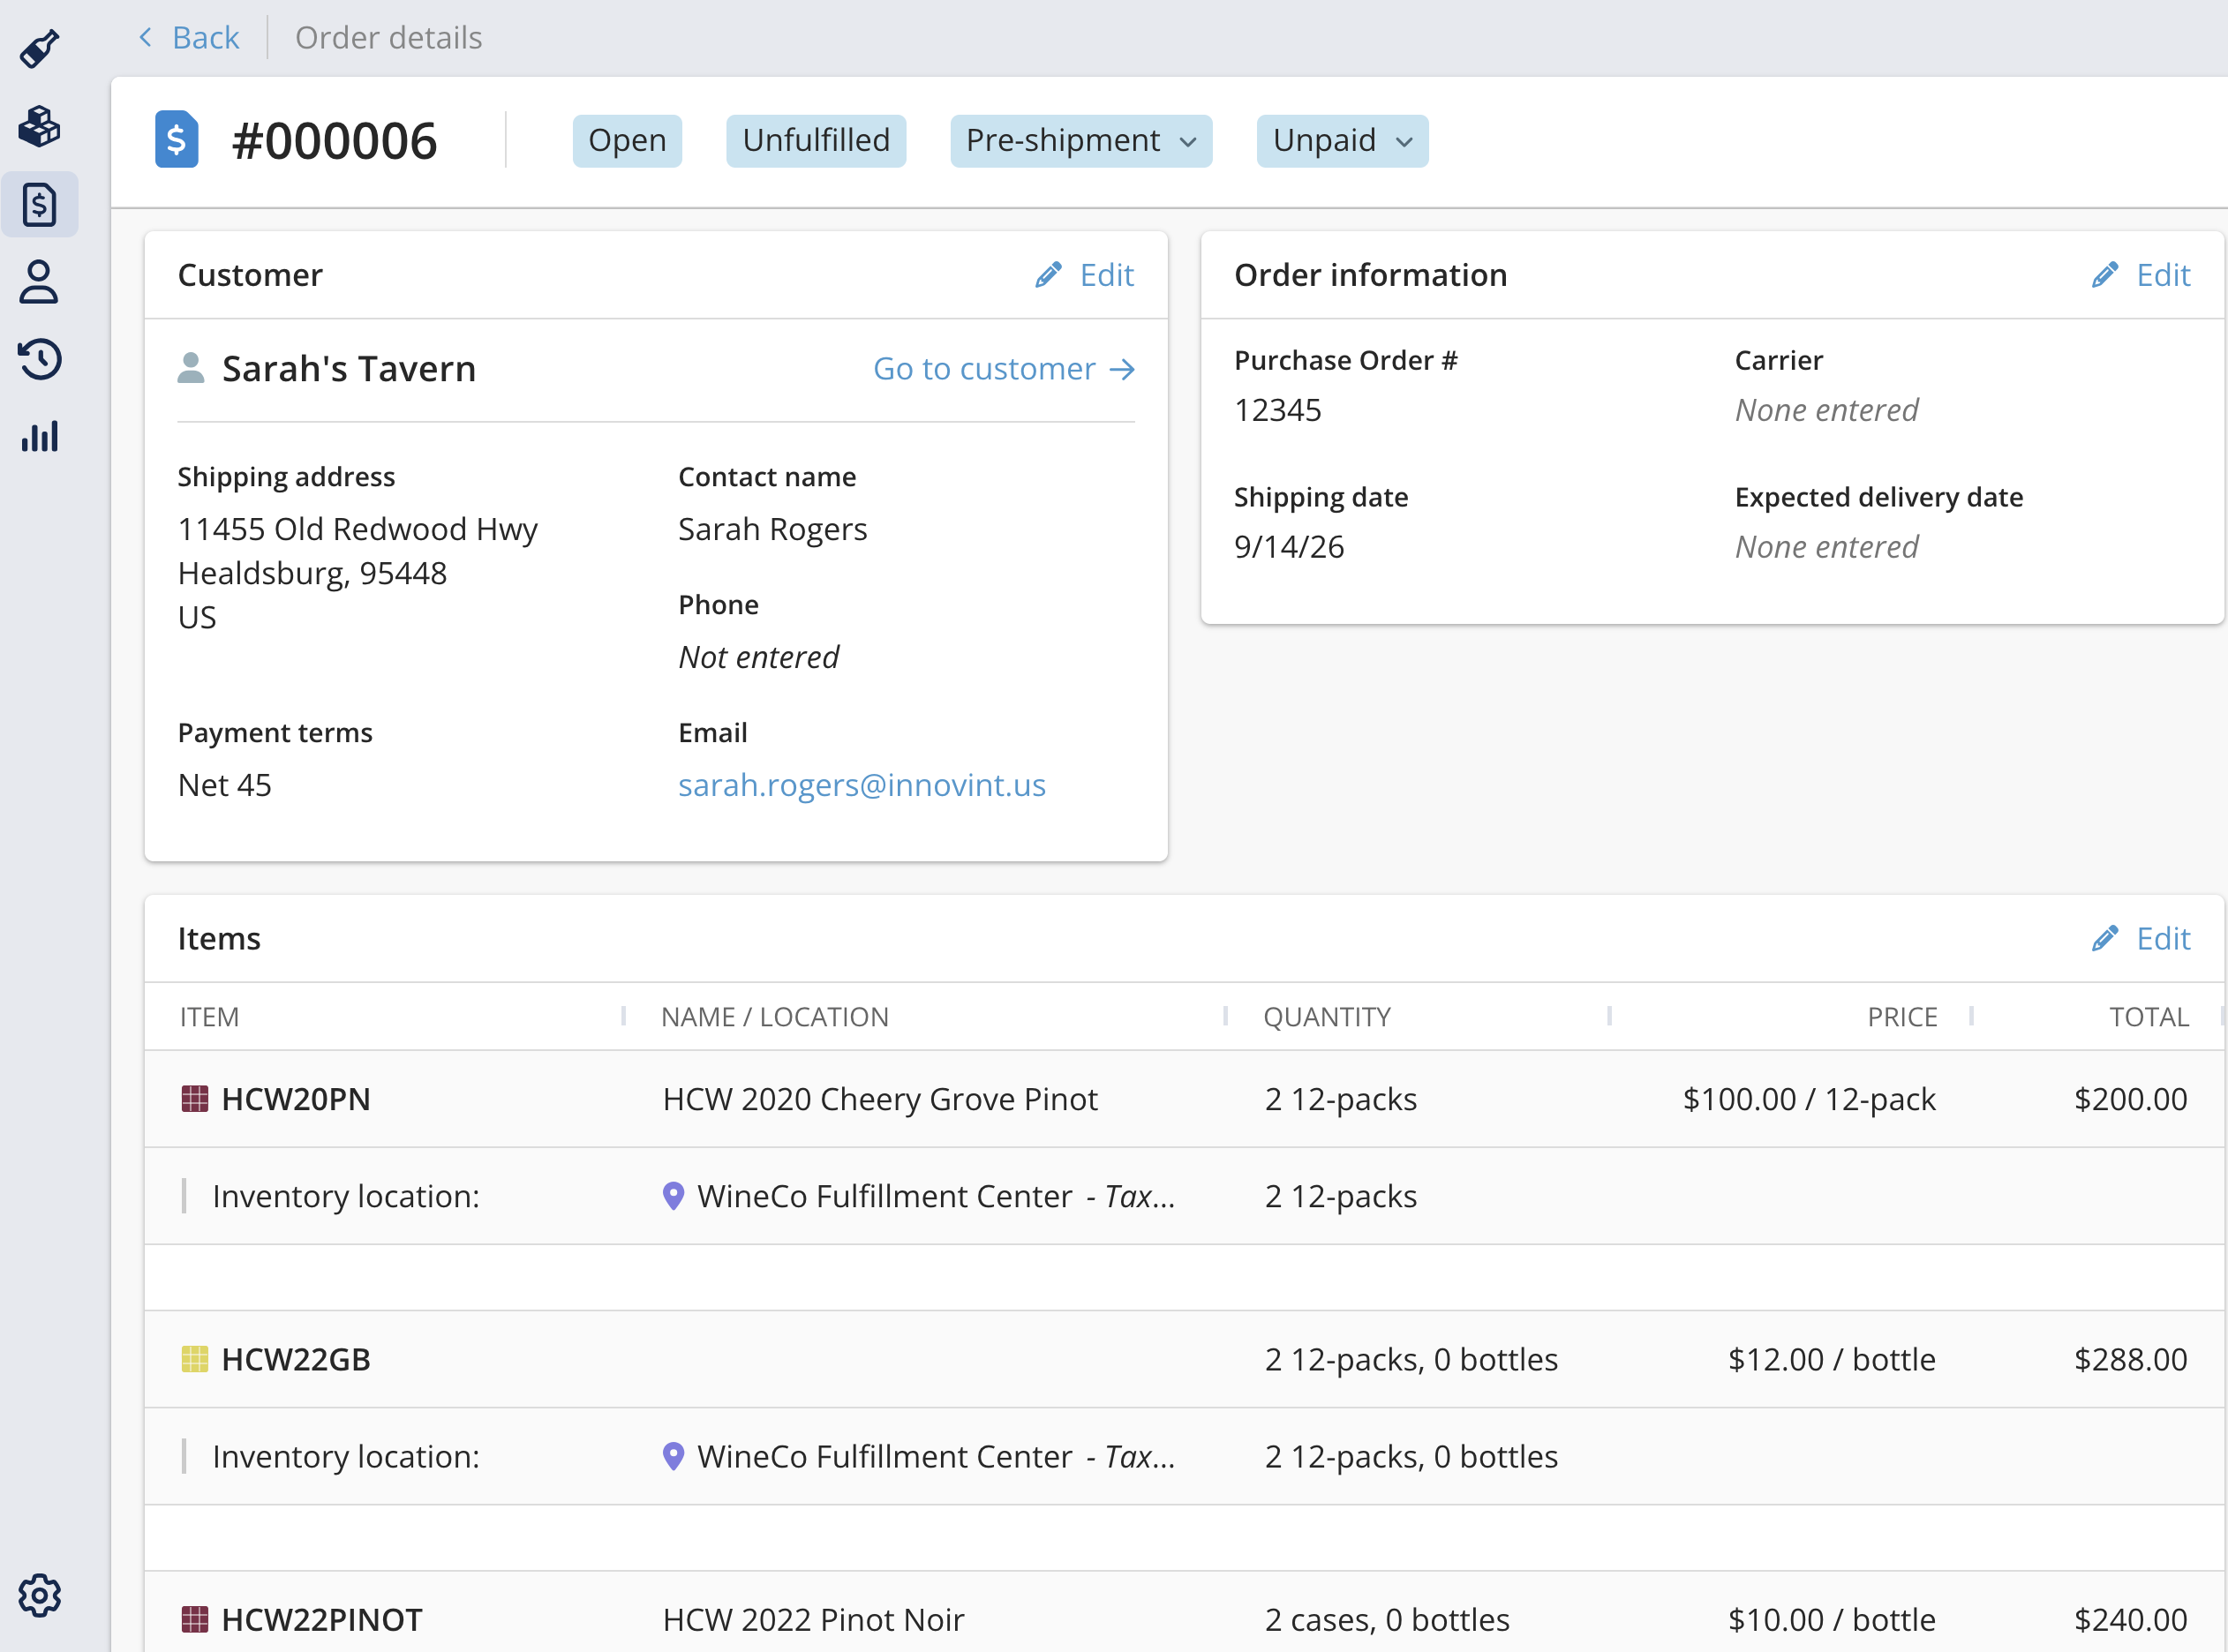
The invoice number matches your SUPPLY order number, the invoice date comes from the SUPPLY order's shipping date, and the due date is calculated from the customer's payment terms. Line item amounts will match your SUPPLY order exactly, as long as the order has no discounts or custom items.
How discounts and custom items are handled
Discounts and custom (non-SKU) line items on an order are not included in the main export file. QuickBooks Online requires an exact, already-existing product or discount name to import a line item successfully, and SUPPLY can't guarantee those names match what's set up in your QuickBooks account.
Instead, if an order has discounts or custom items, SUPPLY generates a second file listing them out. Use it as a reference to add those lines to the invoice manually in QuickBooks after the main import.
Done! From here, use the invoice in QuickBooks as you normally would — send it to your customer, or record a payment against it if you already sent the version from SUPPLY.
Need to update SUPPLY Orders after payment? Use Bulk operations again to update shipping or payment status.
What's in the export file
Each SKU on the order gets its own row.
|
CSV column |
What it contains |
|---|---|
|
InvoiceNo |
The 6-digit SUPPLY order number. |
|
Customer |
The customer's QuickBooks name (falls back to the SUPPLY customer name if none is set). |
|
InvoiceDate |
The order's shipping date (falls back to today's date if none is set). |
|
DueDate |
Calculated from the customer's payment terms (falls back to today's date if no terms are set). |
|
Terms |
The customer's payment terms on the order (blank if none). |
|
Location |
Left blank. |
|
Memo |
The purchase order field from the order. |
|
Item (Product/Service) |
The SKU's QuickBooks name (falls back to the SKU code if none is set). |
|
ItemDescription |
The SKU name, if one is set (blank if not). |
|
ItemQuantity |
The order quantity, converted to bottles. |
|
ItemRate |
The price per unit from the order. |
|
ItemAmount |
ItemQuantity × ItemRate — matches the order's total for that SKU. |
|
Taxable |
Always “N”. |
|
TaxRate / Service date |
Left blank. |
FAQ
Q: Do I need to map every SKU and customer?
A: No. You only need to map the ones whose QuickBooks name is different from their SUPPLY name, or if you are using Product or Customer categories in QuickBooks. Anything that matches already will export automatically using the SUPPLY name.
Q: What happens if a SKU or customer isn't mapped correctly?
A: The import will error on that row in QuickBooks, so nothing is created halfway. Fix the mapping in SUPPLY (or the name in QuickBooks) and re-import.
Q: Can I export more than one order at a time?
A: Yes. Select multiple orders in Bulk Operations to generate a single export file that will create one invoice per order when imported.
Q: Does it matter if my QuickBooks items are inventory or non-inventory?
A: No — the mapping and export work the same way either way.
Q: Does this integration handle payments?
A: Not yet — this feature covers invoice creation only. You can record a payment in QuickBooks once you've received it. A full wholesale payments workflow within SUPPLY is planned for the future.