---
title: "SUPPLY: How to Create & Manage Orders"
description: The Order Management system in SUPPLY lets you manage the full lifecycle of an order from a single place — create the order, edit it as things change, fulfill it against your inventory, and cancel it if needed.
---
[Skip to content](https://support.innovint.us/hc/en-us/supply-how-to-create-and-manage-wholesale-orders#main-content)
[Submit a help ticket](https://support.innovint.us/hc/en-us/kb-tickets/new?hsLang=en)
![InnoVintSupportCenter - header.png\]](https://support.innovint.us/hs-fs/hubfs/InnoVintSupportCenter%20-%20header.png?width=300&height=22&name=InnoVintSupportCenter%20-%20header.png)
Open main navigation
Close main navigation
- [Submit a help ticket](https://support.innovint.us/hc/en-us/kb-tickets/new)
How can we help you today?
- There are no suggestions because the search field is empty.
1. [Support Center](https://support.innovint.us/hc/en-us?hsLang=en)
2. [SUPPLY](https://support.innovint.us/hc/en-us/supply?hsLang=en)
3. [Order Management](https://support.innovint.us/hc/en-us/supply?hsLang=en#order-management)
# SUPPLY: How to Create & Manage Orders
The **Order Management** system in SUPPLY lets you manage the full lifecycle of an order from a single place — create the order, edit it as things change, fulfill it against your inventory, and cancel it if needed.
This article contains:
- [How to create an order](https://support.innovint.us/hc/en-us/supply-how-to-create-and-manage-wholesale-orders#create-an-order)
- [What happens when you add the order](https://support.innovint.us/hc/en-us/supply-how-to-create-and-manage-wholesale-orders#created-order)
- [How to edit an order](https://support.innovint.us/hc/en-us/supply-how-to-create-and-manage-wholesale-orders#edit-order)
- [How to fulfill an order](https://support.innovint.us/hc/en-us/supply-how-to-create-and-manage-wholesale-orders#fulfill-order)
- [How to unfulfill an order](https://support.innovint.us/hc/en-us/supply-how-to-create-and-manage-wholesale-orders#unfulfill-order)
- [How to cancel or reopen an order](https://support.innovint.us/hc/en-us/supply-how-to-create-and-manage-wholesale-orders#cancel-order)
- [How to manage documents on an order](https://support.innovint.us/hc/en-us/supply-how-to-create-and-manage-wholesale-orders#manage-documents)
- [How to manage notes on an order](https://support.innovint.us/hc/en-us/supply-how-to-create-and-manage-wholesale-orders#manage-notes)
#### How to create an order
**1. Navigate to the Order Explorer, then click +Add Order** 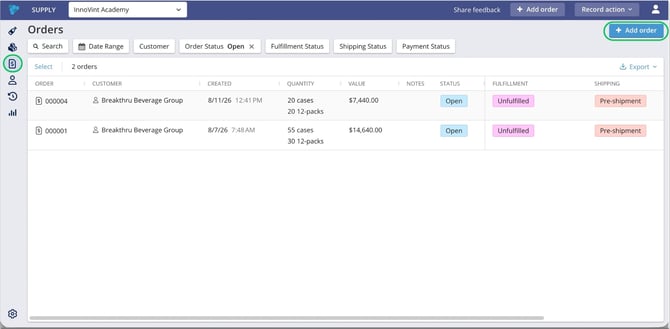
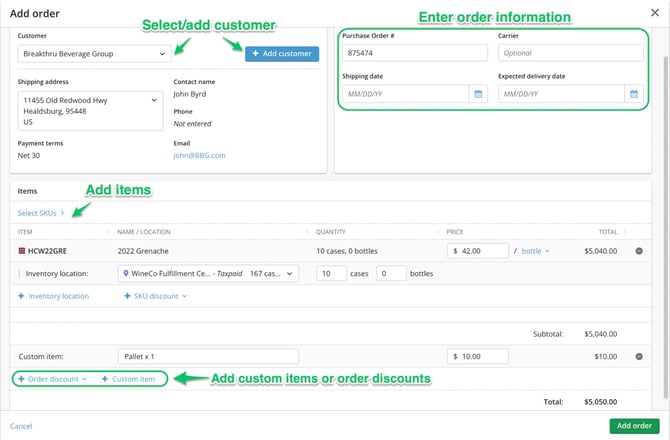
**2. Select a customer**
- Choose a customer from the **Customer** dropdown. Only current, active customers appear here.
- Once selected, the customer's **Contact name**, **Phone**, **Payment terms**, and **Contact email** populate automatically.
- Don't see the customer you need? Click **Add customer** to create one in line — it's saved to your Customer Explorer and applied to this order.
**3. Enter order information**
- **Shipping address** (required) — pre-fills from the customer's record. If multiple shipping addresses exist for the customer, select the appropriate one for the order from the dropdown menu.
- The shipping address will carry through to BOL, if one is generated from the order.
- **PO number**, **Carrier**, **Shipping date**, and **Expected delivery date** are all optional
- The PO number will carry through to BOL, if one is generated from the order.
**4. Add items**
- Click **Select SKUs** to open the SKU picker and choose one or more SKUs.
- For each SKU, select an **inventory location** from the dropdown. Locations with on-hand inventory are listed above the divider; empty locations are listed below.
- Enter the **quantity** for each location.
- **Price** pre-fills from the SKU's default price (per bottle or per case). You can edit the price for this order — doing so does **not** change the SKU's default price.
- If a SKU has no default price set, price displays as $0.00 and must be entered manually before the order can be saved.
- Need to add more than one location for a SKU? Click **Add inventory location**.
**5. Add discounts or custom items (optional)**
- Click **+ SKU discount** to apply a discount to a specific SKU — choose a percent or flat dollar amount.
- Click **Add discount** to apply a discount to the whole order.
- If both a SKU discount and an order discount exist, the order discount is calculated **after** the SKU discount is applied.
- Click **Add custom item** to add a non-inventory line (e.g. pallets) — enter a name and price manually. Custom items don't have a quantity field, so enter the total price directly.
**6. Review totals and save**
- **Subtotal**, **Discounts**, and **Total** display in the bottom right of the items table.
- Click **Add order** to save.
#### What happens when you add the order
- SUPPLY generates a sequential, 6-digit **order number** (starting at 000001).
- All inventory quantities on the order move from **Available** to **On order**.
- Order status is set to **Open**, Fulfillment to **Unfulfilled**, Shipping to **Pre-shipment**, and Payment to **Unpaid**.
- The order appears in the Order Explorer and in the **Orders** table on the customer's detail page.
#### How to edit an order
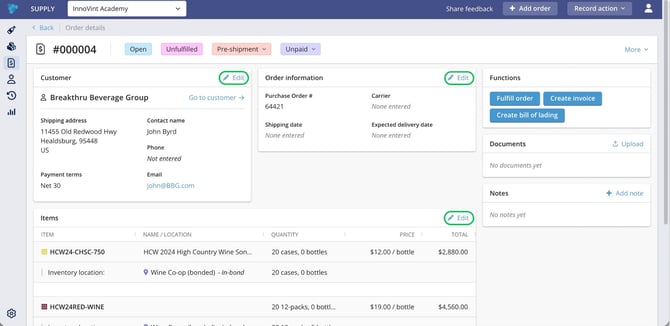
From the Order details page, each card — **Customer**, **Order information**, and **Items** — has its own **Edit** button in the top right corner.
- **Editing the customer:** Click **Edit** on the Customer card to reopen the customer dropdown and select a different customer (or add a new one). Click **Save** to apply the change, or **Cancel** to discard it.
- **Editing order information:** Click **Edit** on the Order information card to edit any field -shipping address, PO number, carrier, dates. Click **Save** or **Cancel**.
- **Editing items:** Click **Edit** on the Items card to change SKUs (via **Edit inventory**), quantities, prices, discounts, or custom items. Any inventory you remove returns to **Available**; anything you add moves to **On order**. Click **Save** or **Cancel**.
Every saved edit adds a new row to the order's **History** table.

**Editing rules based on fulfillment status:**
- **Fully fulfilled order:** the Customer and Items cards can no longer be edited (their Edit buttons are removed).
- **Partially fulfilled order:** the Customer card can't be edited, but the Items card can — except you can't remove a SKU or location that's already been partially fulfilled, and you can't reduce its quantity below what's already been fulfilled (SUPPLY will show *"Inventory quantity must be more than quantity already fulfilled"*).
- **Unfulfilled order:** full edit access to all three cards.
#### How to fulfill an order
1. From the Order details page, click **Fulfill order**. The fulfillment screen opens, pre-populated with the SKUs, locations, and quantities from the order — you can't add or remove SKUs or locations during fulfillment itself.
2. In the **Quantity sold** column, enter how much of each line is being fulfilled now. Fields default to the full order quantity (or whatever remains unfulfilled). You can't enter more than the order quantity — SUPPLY will show *"Fulfillment quantity may not exceed order quantity"* if you try.
3. Choose a **Depletion date**:
- **Now** (default) — uses the current date/time.
- **Backdate** — lets you choose a past date/time.
4. Click **Fulfill order** to submit.
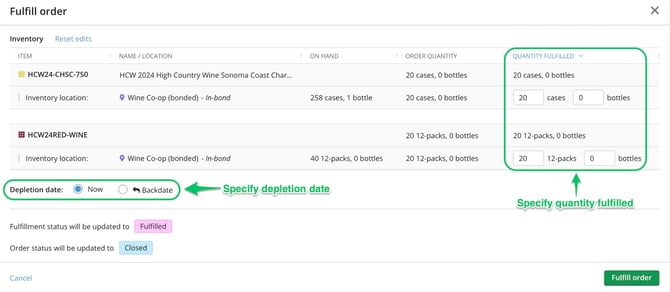This creates a **Deplete inventory – Sale** action for the quantities entered, linked back to the order number. Order status updates based on how much was fulfilled:
- **Fulfilled** — everything on the order (or everything remaining) was entered.
- **Fulfilled – partial** — some, but not all, was entered.
Once every unit on an order has been fulfilled across one or more fulfillments, the order status changes to **Closed**.
> **Note on multi-location SKUs:** if a SKU is split across three or more inventory locations, SUPPLY can't redistribute an over-fulfillment across the remaining locations automatically. In that case you'll see: *"Can't partially fulfill more than order quantity from an inventory location if you have 3 or more locations within a SKU. Edit the items on the order and then fulfill again."*
#### How to unfulfill an order
Made a mistake on a fulfillment? You can't edit a fulfillment directly, but you can unfulfill it:
1. In the order's **History** table, find the fulfillment row and click **Unfulfill**. 
2. A warning modal displays with a link to the associated Deplete inventory – Sale action. Click **Yes, unfulfill** to confirm.
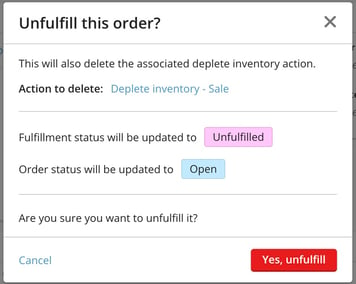
When you unfulfill:
- The Deplete inventory – Sale action is deleted, and that inventory moves back to **On order**.
- The original fulfillment row displays with strikethrough, and a new **Fulfillment deleted** row is added to History.
- Order and fulfillment statuses roll back accordingly — for example, unfulfilling the only fulfillment on an order reopens it and resets Fulfillment status to **Unfulfilled**. 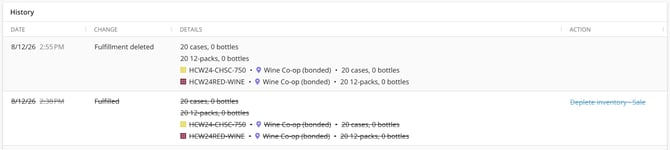
#### How to cancel or reopen an order
**Canceling an order**
1. On an open order, click the **More** dropdown in the top right and select **Cancel order**.
2. All inventory on the order that was marked **On order** returns to **Available**.
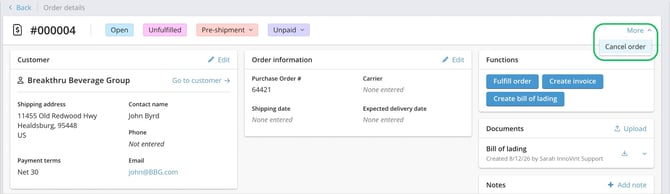Once canceled, function buttons and edit buttons are disabled, and the order status reads **Canceled**. You can still upload, generate, download, and view documents, and add, edit, or delete notes on a canceled order.
> **An order can only be canceled if its status is Open and it has no fulfillments.** If you try to cancel a partially or fully fulfilled order, SUPPLY will prompt you to unfulfill it first.
**Reopening a canceled order**
Select **Re-open order** from the **More** dropdown. This restores the order to **Open**, returns its inventory to **On order**, and re-enables all function and edit buttons.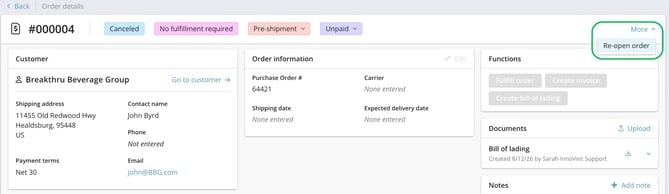
#### How to manage documents on an order
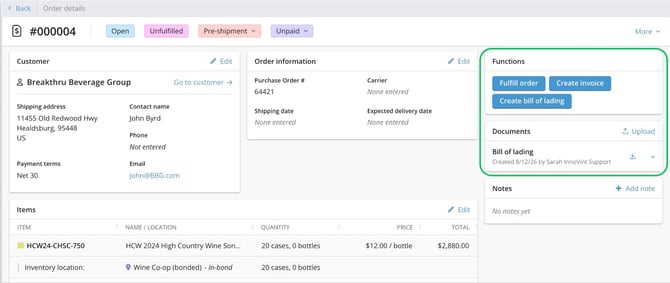
Every order has a **Documents** section where SUPPLY-generated and user-uploaded documents live together, listed in reverse chronological order by creation/upload date. You can create and manage documents on **open and closed** orders — not canceled orders (though you can still view, download, and add documents to an order that was canceled *after* the documents were created).
****
**Uploading a document**
1. Click **Upload** in the Documents header. The Upload document modal opens.
2. Select the file you want to upload. SUPPLY supports the following file types: xls, xlsm, xlsx, doc, docx, csv, pdf, jpg, jpeg, png, heic, txt, rtf, gif, tif, tiff, webp, xml, msg, and eml.
3. Optionally, enter a **name** for the document as you want it to display in the Documents list. If you leave this blank, SUPPLY uses the file's original filename instead.
4. Click **Upload document** to save it, or **Cancel** to close the modal without uploading anything.
Once uploaded, the document is added to the top of the Documents list, titled with the name you entered (or the filename), with "Uploaded MM/DD/YY by \[user\]" beneath it.
**Creating an invoice**
1. Click **Create invoice** under Functions on the order details page.
2. In the Create invoice modal, set the invoice date:
- If the order already has a shipping date, it pre-fills the invoice date, and the **Update order's shipping date** checkbox is unchecked by default.
- If the order has no shipping date, the invoice date defaults to today, and **Update order's shipping date** is checked by default.
- Check or uncheck **Update order's shipping date** to control whether this date also updates the order's own shipping date field.
3. Select a **billing address** — It pre-fills if you have exactly one billing address saved, defaults to blank if you have several, and prompts you to add one in Settings if you have none. A billing address is required.
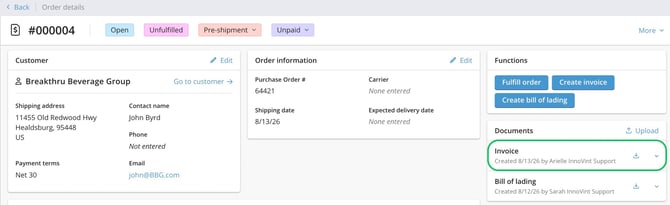
4. Click **Create invoice**. The invoice is added to the top of the Documents list, titled "Invoice," with "Created MM/DD/YY by \[user\]" beneath it.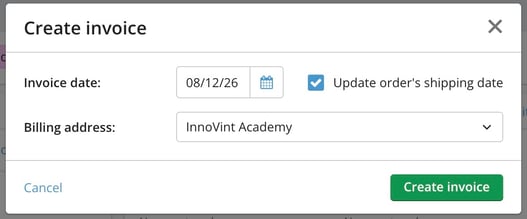
> 
>
> 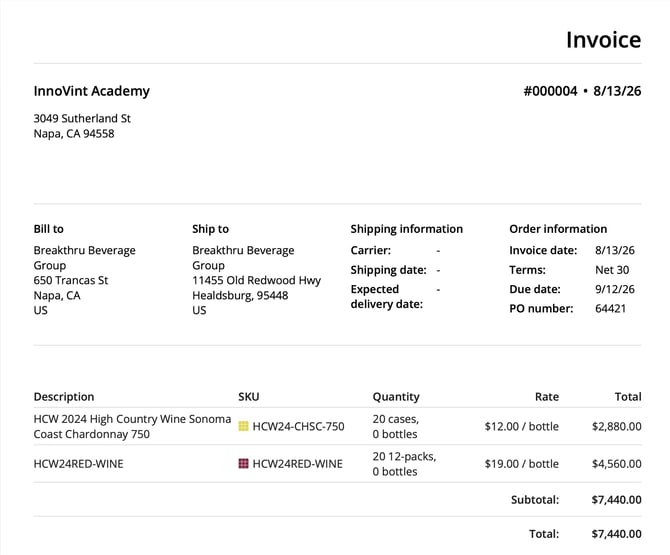
**📌 Note:** If a SKU appears across multiple inventory locations on the order, the invoice sums those quantities into a single line for that SKU.
**Creating a Bill of Lading**
1. Click **Create bill of lading** under Functions on the order details page.
2. The Bill of Lading slideover pre-fills the **Ship to** section with the order's customer and shipping address, and pre-fills SKUs, attributes, and quantities from the order. Custom items on the order do not carry over to the BOL.
3. Edit as needed — you can add or remove SKUs and adjust quantities directly on the BOL.
4. Click **Create BOL**. The document is added to the top of the Documents list, titled "Bill of lading," and downloads automatically. 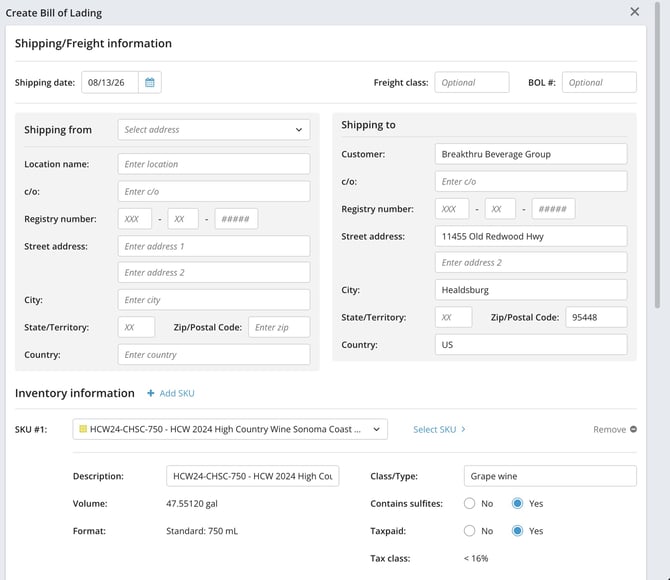
**Downloading or deleting a document**
- Click the **download icon** next to any document's title to save it to your computer.
- Click the **down caret** next to the download icon, then select **Delete \[document type\]**. Confirm in the warning modal by clicking **Yes, delete**, or click **Cancel** to keep the document.
**💡 Tip:** Need to create invoices or a combined BOL for several orders at once? See the bulk actions section [here](https://support.innovint.us/hc/en-us/supply-order-explorer#bulk-actions).
#### How to manage notes on an order
The **Notes** section sits below Documents on the Order details page, and lets you keep freeform text notes on an order.
- Click **Add** to create a new note. Notes support text only.
- You can add as many notes as you need to an order.
- Each note displays the text along with the date/time it was created (or last edited) and the user who created or last edited it.
- Notes display in reverse chronological order, based on creation or last-edited date/time — the most recently added or edited note appears first.
**Editing or deleting a note**
Click into an existing note to edit its text — saving an edit replaces the previous text entirely rather than keeping a version history. You can also delete a note you no longer need.
**📌 Note:** You can only edit or delete notes you created yourself. If you try to edit or delete a note created by another user, SUPPLY displays an error.
- [New to InnoVint](https://support.innovint.us/hc/en-us/new-to-innovint?hsLang=en#main-content)
- [Accessing InnoVint](https://support.innovint.us/hc/en-us/new-to-innovint?hsLang=en#accessing-innovint)
- [Settings - MAKE, GROW & FINANCE](https://support.innovint.us/hc/en-us/new-to-innovint?hsLang=en#settings-make-grow-finance)
- [Getting Started - MAKE, GROW & FINANCE](https://support.innovint.us/hc/en-us/new-to-innovint?hsLang=en#getting-started-make-grow-finance)
- [MAKE](https://support.innovint.us/hc/en-us/make?hsLang=en#main-content)
- [Dashboard & Calendar](https://support.innovint.us/hc/en-us/make?hsLang=en#dashboard-calendar)
- [Lots](https://support.innovint.us/hc/en-us/make?hsLang=en#lots)
- [Vessels](https://support.innovint.us/hc/en-us/make?hsLang=en#vessels)
- [Work Orders](https://support.innovint.us/hc/en-us/make?hsLang=en#work-orders)
- [Recording Actions](https://support.innovint.us/hc/en-us/make?hsLang=en#recording-actions)
- [Movement Actions](https://support.innovint.us/hc/en-us/make?hsLang=en#movement-actions)
- [Topping](https://support.innovint.us/hc/en-us/make?hsLang=en#topping)
- [Analysis](https://support.innovint.us/hc/en-us/make?hsLang=en#analysis)
- [Analysis Reports](https://support.innovint.us/hc/en-us/make?hsLang=en#analysis-reports)
- [Additions](https://support.innovint.us/hc/en-us/make?hsLang=en#additions)
- [Case Goods in MAKE](https://support.innovint.us/hc/en-us/make?hsLang=en#case-goods-in-make)
- [Dry Goods](https://support.innovint.us/hc/en-us/make?hsLang=en#dry-goods)
- [Vineyards](https://support.innovint.us/hc/en-us/make?hsLang=en#vineyards)
- [Reporting](https://support.innovint.us/hc/en-us/make?hsLang=en#reporting)
- [Compliance](https://support.innovint.us/hc/en-us/make?hsLang=en#compliance)
- [Tags & Notes](https://support.innovint.us/hc/en-us/make?hsLang=en#tags-notes)
- [Printing Labels from InnoVint](https://support.innovint.us/hc/en-us/make?hsLang=en#printing-labels-from-innovint)
- [AI](https://support.innovint.us/hc/en-us/make?hsLang=en#ai)
- [GROW](https://support.innovint.us/hc/en-us/grow?hsLang=en)
- [FINANCE](https://support.innovint.us/hc/en-us/finance?hsLang=en#main-content)
- [Getting Started](https://support.innovint.us/hc/en-us/finance?hsLang=en#getting-started)
- [Reporting](https://support.innovint.us/hc/en-us/finance?hsLang=en#reporting)
- [Guidance & FAQ](https://support.innovint.us/hc/en-us/finance?hsLang=en#guidance-faq)
- [Harvest](https://support.innovint.us/hc/en-us/harvest?hsLang=en#main-content)
- [Preparing for Harvest](https://support.innovint.us/hc/en-us/harvest?hsLang=en#preparing-for-harvest)
- [Vineyard Harvest Reports](https://support.innovint.us/hc/en-us/harvest?hsLang=en#vineyard-harvest-reports)
- [Harvest Workflow & Fermentation Tracking](https://support.innovint.us/hc/en-us/harvest?hsLang=en#harvest-workflow-fermentation-tracking)
- [Settings & Preferences](https://support.innovint.us/hc/en-us/harvest?hsLang=en#settings-preferences)
- [MAKE: Advanced Features](https://support.innovint.us/hc/en-us/make-advanced-features?hsLang=en#main-content)
- [Owner-based Permissions System](https://support.innovint.us/hc/en-us/make-advanced-features?hsLang=en#owner-based-permissions-system)
- [Custom Attributes](https://support.innovint.us/hc/en-us/make-advanced-features?hsLang=en#custom-attributes)
- [Blend Trials](https://support.innovint.us/hc/en-us/make-advanced-features?hsLang=en#blend-trials)
- [Tank Maps](https://support.innovint.us/hc/en-us/make-advanced-features?hsLang=en#tank-maps)
- [Sparkling Wine Module](https://support.innovint.us/hc/en-us/make-advanced-features?hsLang=en#sparkling-wine-module)
- [Intended Use](https://support.innovint.us/hc/en-us/make-advanced-features?hsLang=en#intended-use)
- [Integrations](https://support.innovint.us/hc/en-us/make-advanced-features?hsLang=en#integrations)
- [SUPPLY](https://support.innovint.us/hc/en-us/supply?hsLang=en#main-content)
- [Getting Started with SUPPLY](https://support.innovint.us/hc/en-us/supply?hsLang=en#getting-started-with-supply)
- [Actions in SUPPLY](https://support.innovint.us/hc/en-us/supply?hsLang=en#actions-in-supply)
- [Using SUPPLY](https://support.innovint.us/hc/en-us/supply?hsLang=en#using-supply)
- [Order Management](https://support.innovint.us/hc/en-us/supply?hsLang=en#order-management)
- [InnoApp](https://support.innovint.us/hc/en-us/innoapp?hsLang=en#main-content)
- [InnoApp](https://support.innovint.us/hc/en-us/innoapp?hsLang=en#innoapp)
- [InnoApp - Work Orders](https://support.innovint.us/hc/en-us/innoapp?hsLang=en#innoapp-work-orders)
- [Guidance & FAQs](https://support.innovint.us/hc/en-us/guidance-faqs?hsLang=en#main-content)
- [Frequently Asked Questions](https://support.innovint.us/hc/en-us/guidance-faqs?hsLang=en#frequently-asked-questions)
- [Specialized Workflows](https://support.innovint.us/hc/en-us/guidance-faqs?hsLang=en#specialized-workflows)
- [Best Practices](https://support.innovint.us/hc/en-us/guidance-faqs?hsLang=en#best-practices)
- [Templates](https://support.innovint.us/hc/en-us/guidance-faqs?hsLang=en#templates)
- [InnoVint Academy](https://support.innovint.us/hc/en-us/innovint-academy?hsLang=en#main-content)
- [Video Trainings/Tutorials](https://support.innovint.us/hc/en-us/innovint-academy?hsLang=en#video-trainings-tutorials)
- [Video Informational Sessions](https://support.innovint.us/hc/en-us/innovint-academy?hsLang=en#video-informational-sessions)
- [Quick Video Tutorials](https://support.innovint.us/hc/en-us/innovint-academy?hsLang=en#quick-video-tutorials)
- [Product Updates](https://support.innovint.us/hc/en-us/product-updates?hsLang=en#main-content)
- [Product Updates: 2025-2026](https://support.innovint.us/hc/en-us/product-updates?hsLang=en#product-updates-2025-2026)
- [Product Updates: 2024](https://support.innovint.us/hc/en-us/product-updates?hsLang=en#product-updates-2024)
- [Product Updates: 2023](https://support.innovint.us/hc/en-us/product-updates?hsLang=en#product-updates-2023)
- [Product Updates: 2017 - 2022](https://support.innovint.us/hc/en-us/product-updates?hsLang=en#product-updates-2017-2022)
- [Support Hours & FAQs](https://support.innovint.us/hc/en-us/support-hours-faqs?hsLang=en)
[](https://support.innovint.us/hc/en-us?hsLang=en)
Copyright © 2025, InnoVint