Destination locations can be saved to your InnoVint account to help you quickly fill in the 'Shipped to' details within a Bill of Lading.
This article covers:
- Introduction to Locations
- Add a New Location
- Edit or Delete a Location
- Locations on B2B Transfers
- Use Locations in BOLs
Introduction to Locations
You can add, edit, and remove locations from your account from Settings > Shipping locations. Account Admins and Team Members (including Team Members - Cannot Submit Work Orders) have access to view and manage locations.
Note: For Custom Crush facilities, locations are not saved with an Owner tag. The full location list is available to all users with Admin or Team Member capabilities.
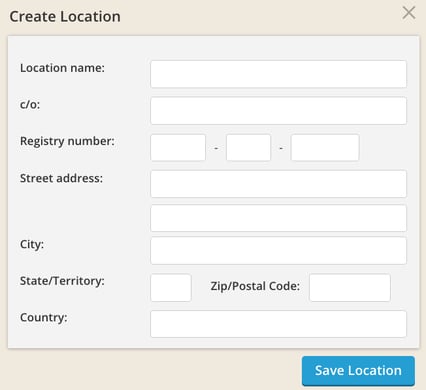
Add a New Location
- Go to Settings > Shipping locations.
- Click on + Add location in the top right corner.
- Enter a location name (required) and any additional desired details (these are all optional). A Registry (bond) number is NOT required.
Each location must be unique in your account. The combination of location name, c/o, and registry number are used to determine if a location is unique. For example, you can create 2 locations with the same location name, but different registry numbers. - Click on Save Location.
Edit or Delete a Location
- Go to Settings > Shipping locations.
- Click on edit > on the far right of the appropriate row.
- To edit, revise any of the input fields, then click Save Location.
- To delete, click the gray Delete Location text near the bottom left corner.
Locations on Bond to Bond Transfers
When recording a B2B Transfer In or B2B Transfer Out direct action or work order task, you can now add a "From" or "To" location. This is not a required field, but if you select a location, and generate a Bill of Lading, then this location information will pre-populate in the Bill of Lading. 
Including the Shipping Location of another InnoVint winery will not result in the bond transfer of wine to this InnoVint winery. This is a reference field only. To move volume into another existing InnoVint bond, use the B2B to another InnoVint Winery action, or a B2B within Winery action.
Use Locations in BOLs
Locations can be selected when creating a Bill of Lading. Click on the dropdown in the top right corner of the 'Shipped to' section to select your destination location and automatically fill in the saved details. All fields are still editable if you need to make any changes.

The 'Shipping from' fields are auto-populated by the selected lot on the B2B action or BOL, according to the bond details associated with that lot.