Dip charts are not available at all subscription levels. For more information, please contact Customer Success at support@innovint.us.
Dip charts are used to assign dip measurements to tank volumes. In InnoVint, you can enter a dip measurement into an action or open task, and the system will convert that value into volume. Dip measurements are available on open work order tasks, but not at work order creation.
This article covers:
- Introduction to Dip Charts
- Creating Dip Charts
- Editing or Deleting Dip Charts
- Using Dip Charts in Actions and Tasks
- Dip Chart Import Template
Introduction to Dip Charts
You can add, edit, and remove dip charts from your account from Settings > Dip Charts.
From here, you can enable or disable the dip charts feature, view all current dip charts, or create a new dip chart.
Only account Admins have access to activate dip charts, but Team Members can also add, edit and modify dip charts.
Enabled/Disabled
To enable dip charts in your account, select the button for 'Enabled'. This selection can be changed at any time.
Creating Dip Charts
- Go to Settings > Dip Charts
- Click on the Create Dip Chart button in the top right corner
- Enter a chart name (required) and description (optional)
- Select a dip type: Dry or Wet.

- Under Applied to, click on Add Tank to access a dropdown list of your tank inventory. Select one or more tanks from the list

- To import a dip chart, click on Choose File and select the appropriate csv file from your computer. Download the example file as a template for the required csv format (available from the dip chart creation page, or at the bottom of this article). See below for specifications.
- After your dip chart has been imported, click Add at the top right corner of the page to save your new dip chart.
- Double check your imported dip chart in InnoVint for any mistakes. Confirm that your measurement unit is correct and the wet and/or dry volumes match as expected.
If you do find an error, click on the blue pencil in the top right corner to edit the dip chart and import a new, corrected csv file.
Note: Dip charts can only be applied to tank vessel types.
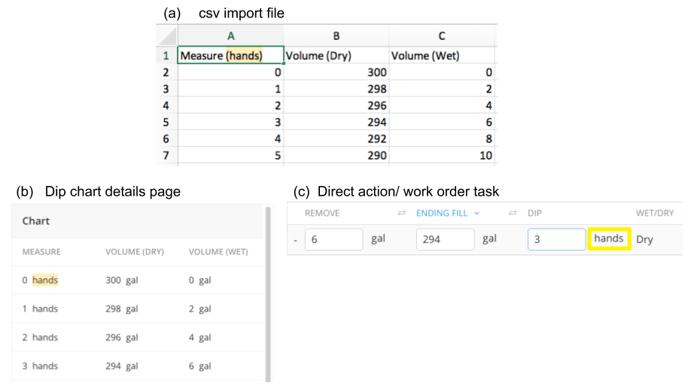
Specifications for the csv import file
- The example csv includes 3 columns:
- Measure (inches)
- Enter any unit within the parentheses. Ex. (cm)
- The specified unit in (a) the csv file, will display in (b) the dip chart details page, and (c) within direct actions and work order tasks.
- Measure (inches)
-
- Volume (Dry)
- This column should include corresponding volumes to a dry dip measurement.
- Volume (Wet)
- This column should include corresponding volumes to a wet dip measurement.
- Volume (Dry)
- The Measure column is required. Both the wet and dry columns must have values - even though users select either a "Wet" or "Dry" Dip Type. There must be a value for each line of both columns, don't leave any blanks. Users can either fill out each column accurately, or put all zeros in one of the columns (wet or dry).
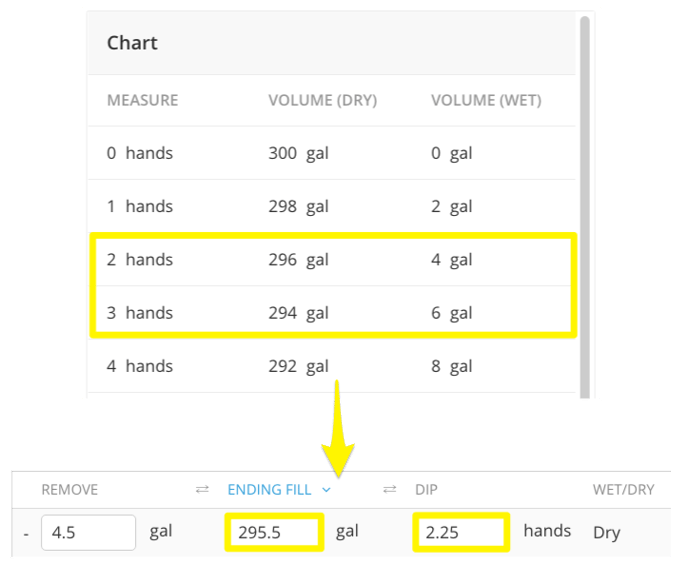
- The imported measurement scale can be as large or small as you'd like. When a dip measurement is entered in a direct action or work order task that does not match the exact imported values, InnoVint will calculate the proportional difference between the two known values to determine the approximate volume.
Editing or Deleting Dip Charts
- Click on a row in the Dip Charts Settings page to access the Dip Chart details.
- To edit a dip chart, click on the blue pencil in the top right corner.
Make your adjustments as needed, then click the green Save button. - To delete a dip chart, click on the trash can icon in the top right corner.
Using Dip Charts in Actions and Tasks
Dip chart measurements can be entered on actions or tasks in order to calculate the volume equivalent of the measurement value. Dip chart fields are available:
- in direct actions on the desktop app
- in open work order tasks on the desktop app
- in open work order tasks on InnoApp - find out about recording dips on InnoApp tasks here!
Entering a dip measurement will automatically adjust the removed/added volume and the ending fill, just as adjusting the removed/added volume or ending fill will also adjust the dip measurement.
